BLOG
|
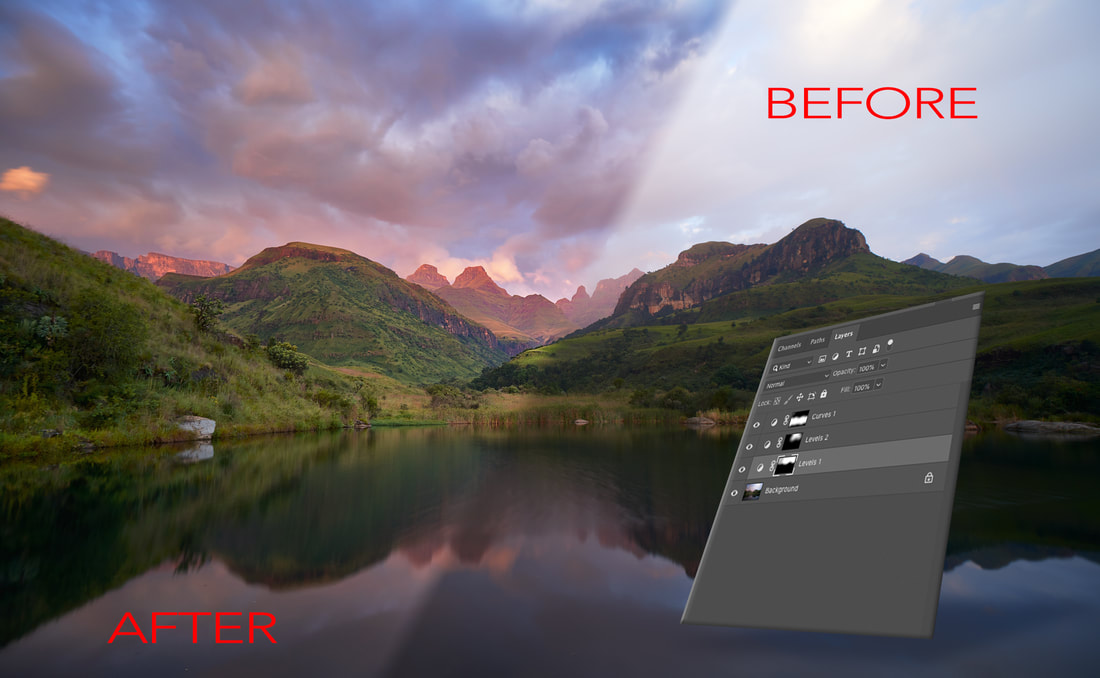 Editing in layers is a principle concept for being able to work in Photoshop. In this post we'll take a look at very basic masking techniques to start down the road of layered editing in Photoshop, or any other bitmap editor for that matter.
 When you are in a programme like Lightroom or Capture One, the use of presets becomes a quick and easy - as well as fast - way to make changes to images. Rather than changing every setting individually, a photographer can select a preset that they have created, or even bought, to reset several parameters to one or several images at a time. To say that saves time is an understatement. Taking all the time required to individually adjust images, the use of presets can literally save hours out of a week of editing.
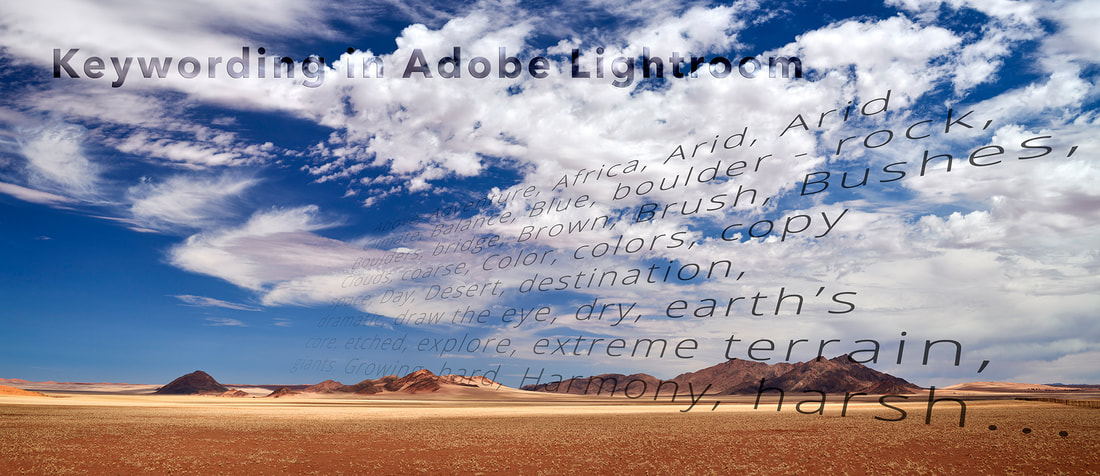 Lightroom has a killer feature that seems to often get overlooked by people who use it - Keywording. Maybe it’s because keywording is the least sexy part of the image pipeline. Yet it is an extraordinarily important part of every photographer’s workflow, and one that is not given nearly enough attention as it should. Keywords are by far the best way to find photographs when you have a large number of images that need to be sorted through. Lightroom continues to be one of the easiest ways to add keywords to an image, and one of the fastest ways to fin an image in a vast library, so long as you have actually keyword the images in the first place.
 Nik, as an application, has been around since 2000 when it was was first incorporated into Nikon’s RAW software called Capture NX2. What made the software special was something called U-point technology. In a rather trite naming convention, it is supposed to refer to the fact that '‘you point somewhere, and it works'’. Yet, this is pretty much how U-point does work. Nils Kokemohr (founder and CTO of Nik Software), managed to create an application that looks at luminosity, colour and tone as a way of selecting an area for image editing. To this day, it is one of the most intuitive and effective ways to select localised areas in an image for colour editing. At any rate, Nik’s intellectual property has passed through several hands from Nikon, to their own, to Google and thence to DxO. In a nutshell, the selection tool that was first introduced in 2000 is still going strong, yet there are photographers who still aren’t aware of it’s power and how to use it effectively.
 The number one reason why images fail, is focus (possibly it’s a tie between that and poor composition, but even the latter can be excused by some as art 😉). There’s that gut twisting realisation when you are going through the images from a shoot only to realise that the focus was out. What could have been fantastic, gets added to the trash pile. We now have blistering fast auto focus, face detection, dynamic tracking, 3D tracking, a gazillion focus points, micro-tuning (automatically calibrated on some cameras even) and more. You’d think that it would be as simple as pressing a button and shooting. But it’s not. Although we can get passably sharp results almost every shot, we still miss critical focus from time to time (if not more occasionally) and it is mind-numbingly frustrating!
There are a number of things we can do to try and improve focus when we are shooting, whether it’s shooting a landscape, a moving animal, or a close-up. I personally feel that correcting focus falls under these three broad categories of; Calibration, Settings and Technique.  I am admittedly stubborn when it comes to post-production. Although I am a firm advocate of continuously learning new techniques, I do tend to be late on the uptake. As is the case with Adobe’s Merge to HDR pano feature in the latest version of Camera RAW (version 11.3). For a long time I have had a tedious, but effective, workflow creating HDR panoramic both for my own images, as well as for clients. The technique has involved layering images and selectively blending them into individual frames which are then stitched together to form a panoramic. The technique was long-winded, difficult to learn, easy to mess up, but extremely effective. Then Adobe gives everyone the ability to do it at the click of a button. It seems almost like cheating it’s so easy.
Here is the new process in a few easy steps:  One of the headline features when Capture One Pro 12 (C1 announced earlier this year the ability to create luminosity masks and apply adjustments in a layered fashion to an image). This is a fantastic addition that means there is one reason less (potentially) to dive into Photoshop. It isn’t quite as accurate as working with luminosity masks and layers in Photoshop itself, but it is close enough that for many photographers it can negate the need for the fully fledged bitmap editor (PS).
Photographers who do a lot of landscape photography are well aware of the dirt and debris that can build up inside the tubes and locks of their tripods over time. It actually isn't that difficult to strip and clean a tripod, but a lot of photographers are nervous about doing it. Below is a short video outlining the easy steps to dismantling, cleaning and re-greasing your tripod to ensure a longer life and better handling. Enjoy. 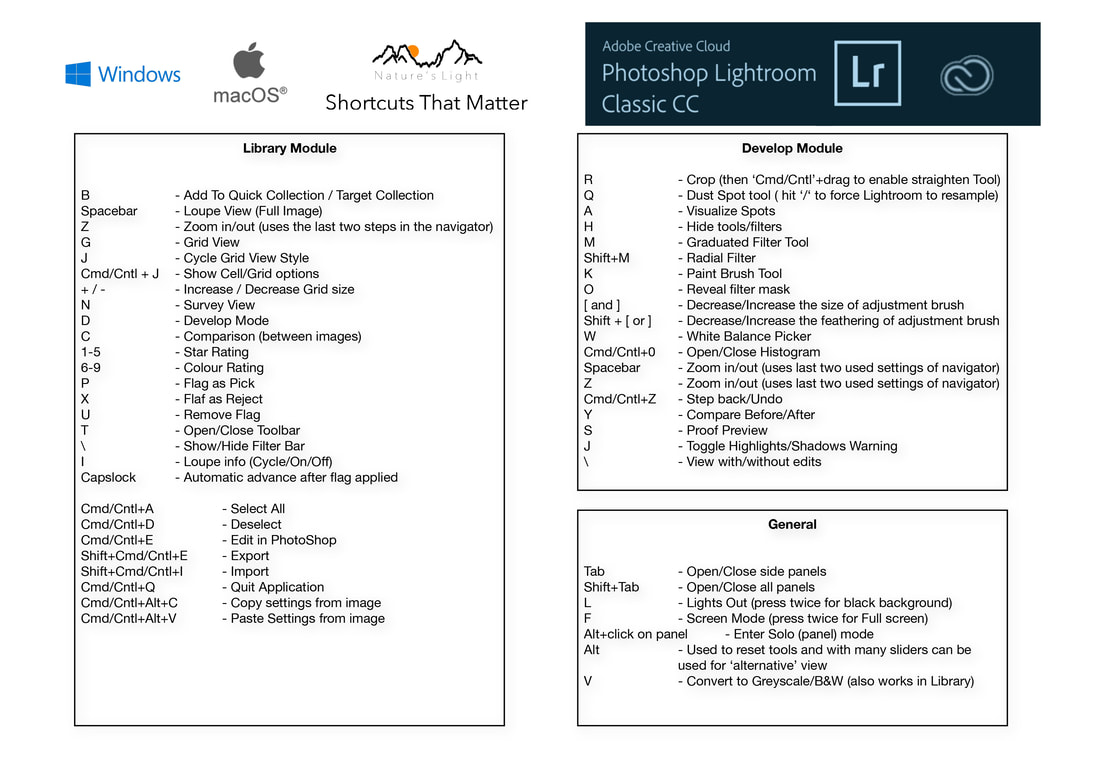 One of the easiest ways to improve both the speed with which you work on your images, as well as your overall experience when working with an editing app, is knowing the shortcuts. So, we've put together the shortcuts that we use the most when editing images. Yes, there are going to be some shortcuts that are missing from this collection. These are the ones that we use all the time. You can also see the full set of shortcuts that are available to Lightroom isn't as customizable out of box as Photoshop is unfortunately. If you want to change keyboard shortcuts you have to do so via the actual operating system (Windows/ Mac OS) by diving into System Preferences. It's easier to get used to the shortcuts on offer quite frankly. The trick to learning shortcuts is to choose one shortcut for a tool that you use regularly and force yourself to use just that one shortcut instead of the menu item for that day (e.g. use the key B instead of selecting the brush tool from the tool palette). In almost no time a muscle memory will start to develop and you will soon forget how to find the tool through the menu (this can be equally frustrating though). Still, I personally prefer knowing the shortcut and not knowing where it is in the menu to having to menu-dive every single time I work in PS. Below is a downloadable files for both Mac Os and Windows PC versions of our Lightroom Shortcuts that matter. Let us know if they help.
|
Nature's Light
|
||
 RSS Feed
Services |
Company |
|