BLOG
|
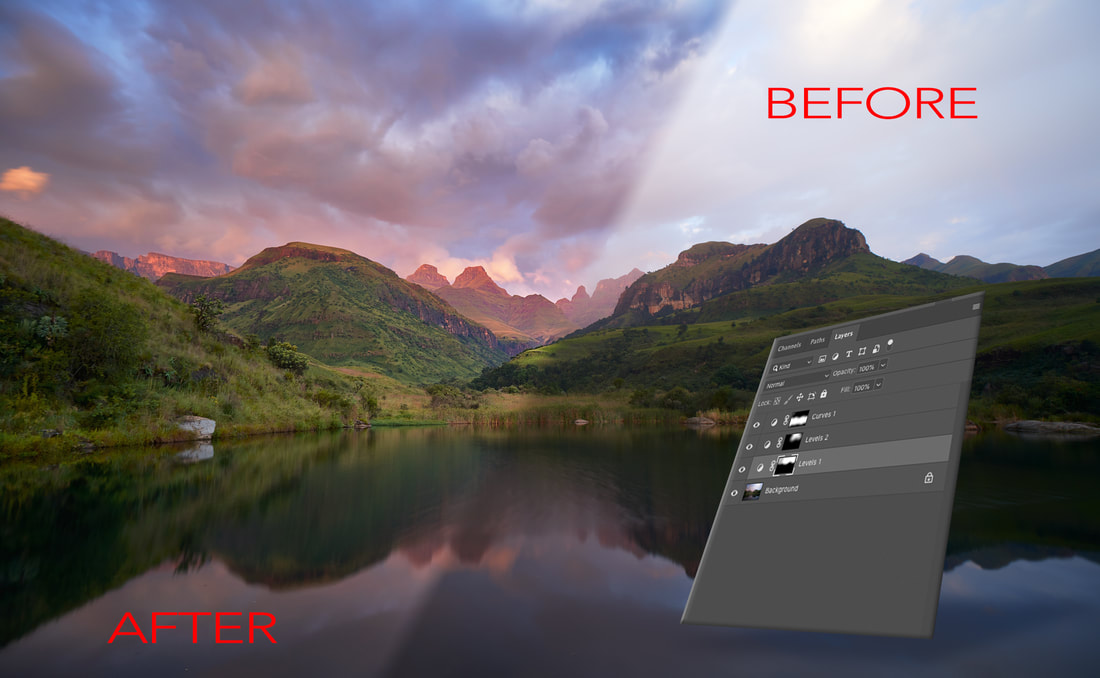 Editing in layers is a principle concept for being able to work in Photoshop. In this post we'll take a look at very basic masking techniques to start down the road of layered editing in Photoshop, or any other bitmap editor for that matter. If you haven’t already read the introduction to layers and masks, please go through and read it on this link (https://www.natureslight.co.za/blog/quick-and-dirty-layers-and-masks) as what follows requires a basic understanding of the layer and mask concepts in editing. This is a basic walk through in creating a layered edit to an image. Open an image in Photoshop that requires an edit to a localised area of the image (editing the sky is the simplest to start with). For the example I am going to use here, there are three ways to make the basic selection of the sky in order to edit it. Any of these will work, and all are dead simple Method 1 (simplest method to understand) - With only the background layer in the layer palette, click on the yin-yang symbol for an adjustment layer like the Levels Adjustment. This creates an adjustment layer above the background layer with an attached mask filled with white ink.  We now want to localise the change to just the sky. The easiest, least complex way is now to take a brush (shortcut key - ‘B’), change the ink to black, and paint the area that you do not need adjusted in the image (see short video). You can change the colour of the brush in the colour swatch at the bottom of the tools palette. 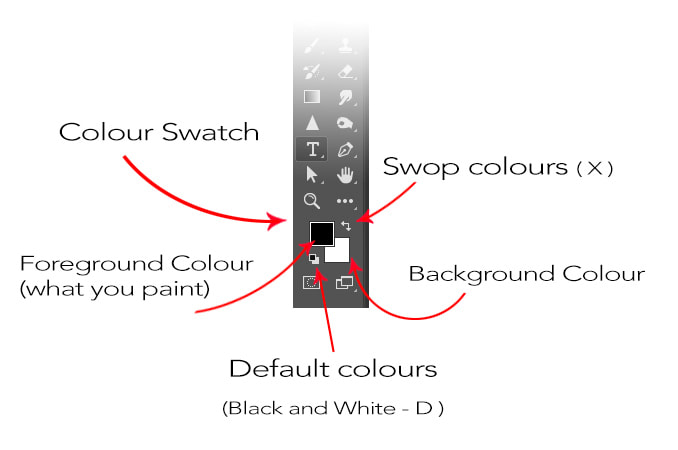 As described in the article explaining the concepts of layers and masks, black ink painted onto a mask essentially cuts through to the layer below, while white ink shows content on the layer that the mask is attached to. White Ink Reveals, Black Ink Conceals. Watch the short video (33 seconds) below for a run through if this first method.  Method Two (slightly more complex) - For this approach follow the same steps above to create the adjustment layer and darken the sky. Instead of using a brush to paint out the area that doesn’t need the adjustment, select the gradient tool. The gradient tool is attached to the paint bucket tool (shortcut key ‘G’ - if the shortcut gets the paint bucket, hit ‘Shift+G’ to cycle the tool to Gradient Tool). To create the gradient in the mask, set the colour swatch to black ink and click and drag on the image. Where you start the gradient will be the edge of the black ink, where you lift off/release will be the edge of the white. So if you are wanting to cut though to the layer below with black ink, you should start the gradient from the bottom and move upwards (remember, black ink cuts to the layer below, while white reveals the attached layer). The advantage of this this technique is the speed with which the mask is created. The gradient can also be adjusted by using a brush on the same mask to remove or add to the initial gradient. The downside is that the initial mask is purely linear (a straight line). Watch the video below for a quick (21 seconds) run through of using the gradient tool to build a mask. Method Three (more advanced and a springboard to much more complex layering) - The principle in this method is to create a selection and then apply a mask to this selection. It’s a good idea to practice this as it forms the backbone to luminosity and other types of advanced making. Select the free hand Lasso tool (shortcut key ‘L’ or to cycle to it, ‘Shift+L’). Draw around the area that you are wanting to select for adjustment, in this case the sky. Draw roughly so that portions of the foreground (mountains in this case) are included. You do NOT need to be accurate. In fact it’s better to have an edge that incorporates more than selected area as we are going to soften this edge and refine in the next step. 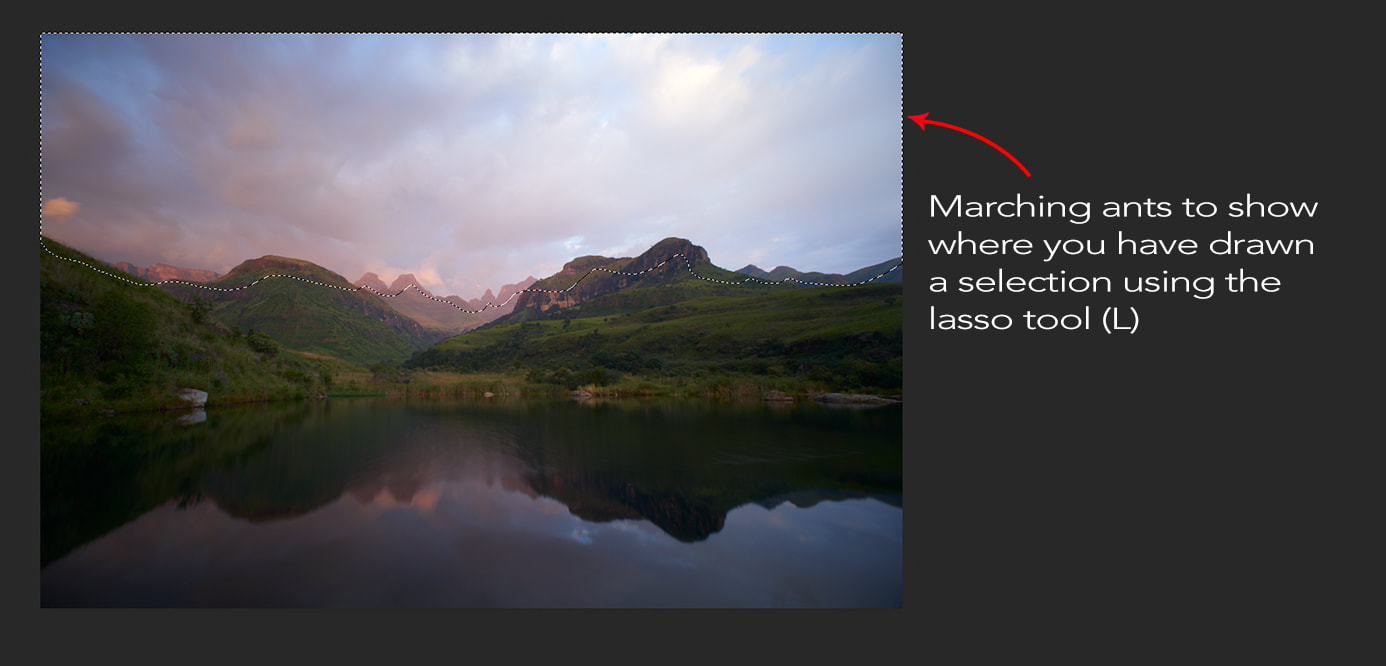 Once the selection is in place (visible with the ‘marching ants’) select the yin-yang symbol in the Layers Palette and select the adjustment you want to use. A new adjustment layer will be created, but this time the mask will be based on the selection that was made. 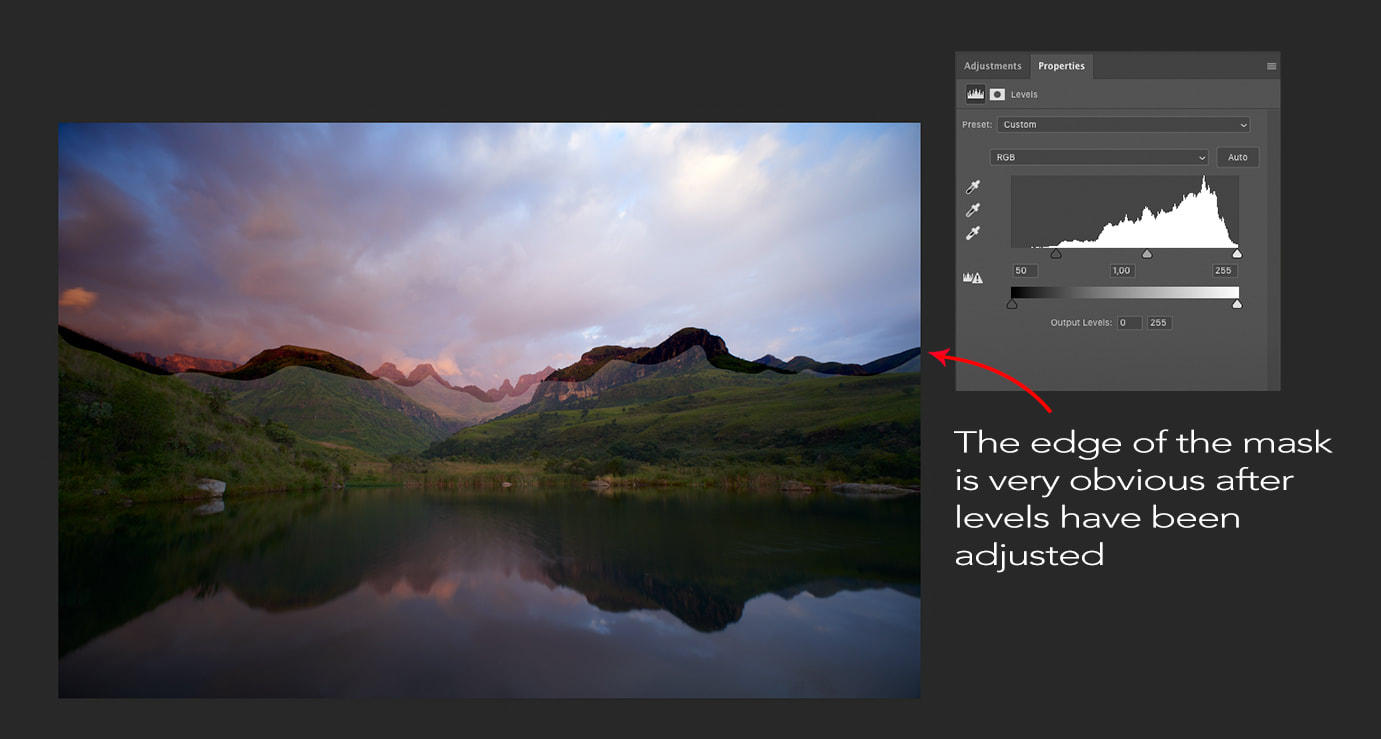 The edge of the mask is very obvious once you start making the adjustment. AS mentioned above we are going to soften the image using the Feather slider in the Masks section Properties Panel (if the Palette/Panel isn't visible you can find it by going to Window>Properties). 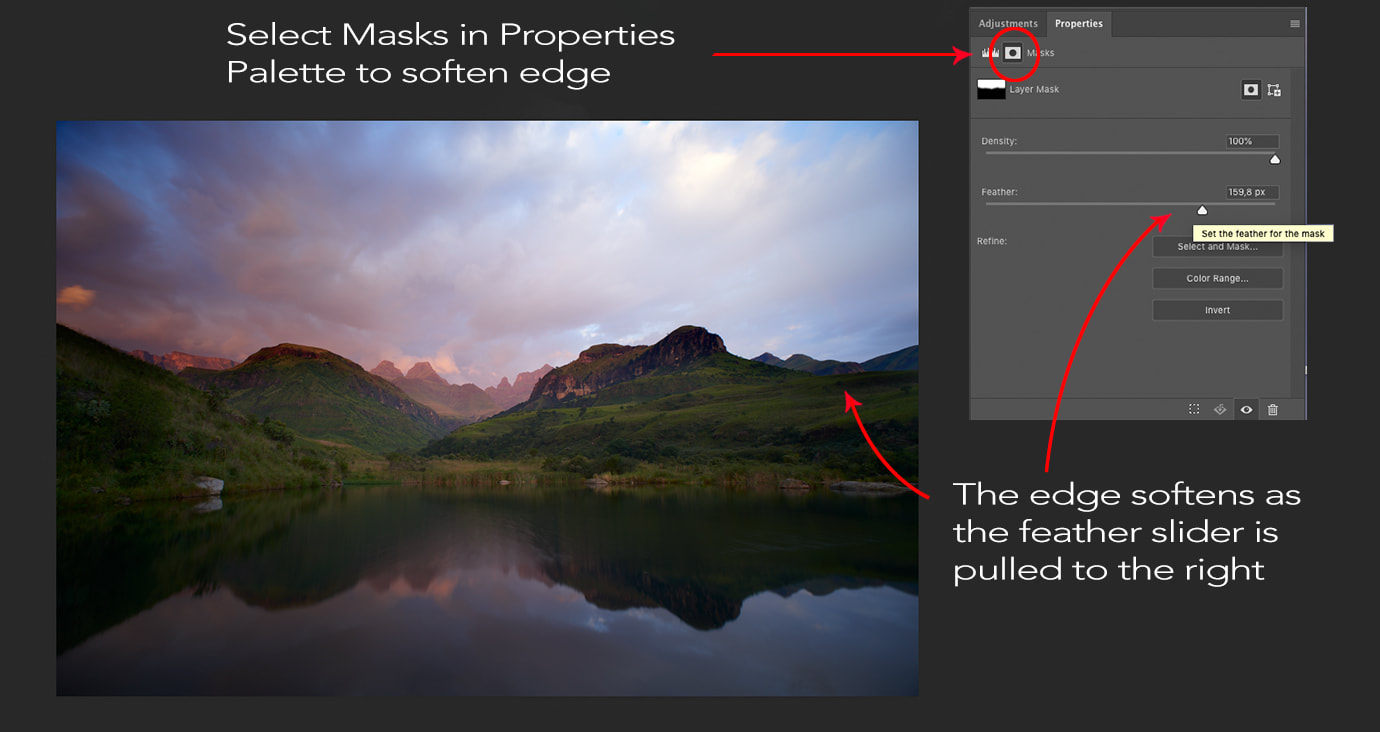 The video below is a short (48 seconds) walk though using the lasso tool to build a mask. The advantage of this technique is that you can create quick selections around oddly shaped objects to create masks. You can then use a brush to refine these masks if necessary. Using a combination of the three methods you can now add several adjustment layers in order to build adjsutments onto an image. Because each adjustment is on a new layer you can fine-tune each change, while making sure that the underlying original image isn't damaged in any way Layer based editing is non-destructive and reversible! To finish off, here are few more layers that I added to get to the final image (click on the image to get a larger view to see the Layers Palette). 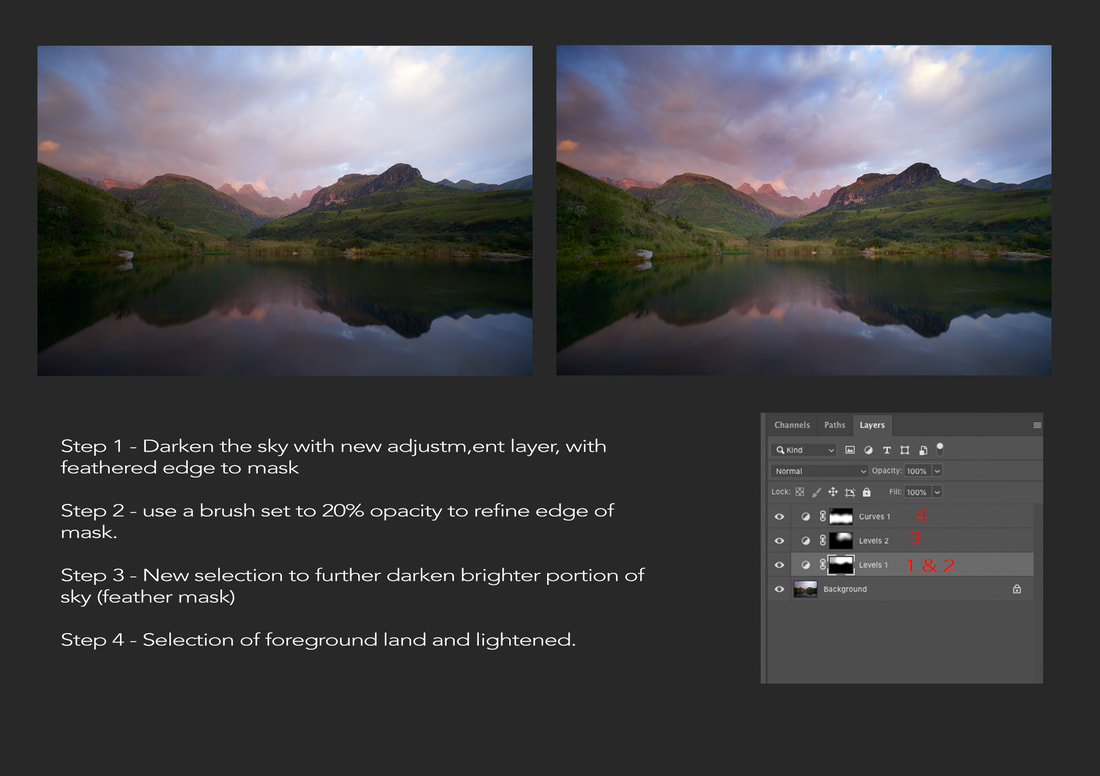 With practice, layered editing is very easy. Complex images can easily quickly up having a dozen (or significantly more) separate layers for the various adjustments to be made to an image. The easiest way to see the before and after results, is to hold down the Alt/Option key on the keyboard and click with the mouse on the eye icon next to the background layer. This switches off all the layers above the background layer for a quick comparison.
Have fun, and please drop us a message in the comments below if you found this useful.
2 Comments
1/14/2022 12:21:31
Very much appreciated. Thank you for this excellent article. Keep posting! 3/16/2022 15:40:38
Excellent article! Your post is essential today. Thanks for sharing, by the way. Leave a Reply. |
Nature's Light
|
 RSS Feed
Services |
Company |
|