BLOG
|
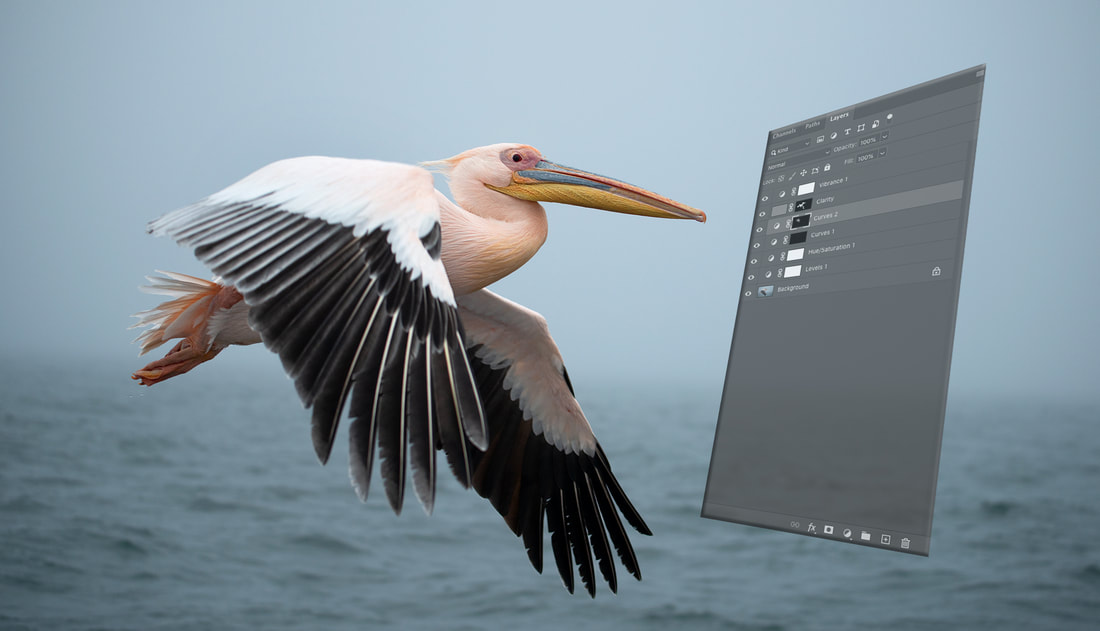 Understanding how to edit an image in Photoshop boils down to three core fundamentals, these being; layers, selections and adjustments. Everything that can be done in Photoshop, from the simplest edit to most complex of photo montages, revolves around the use of these three core features. Obviously there is more to layers, selections, and adjustments as you become more knowledgeable of Photoshop, but these are the building blocks that have to be understood in order to get any further in Photoshop editing. The concept of editing in Layers is simply the idea that every time you add something to an image, be it extra pixels, or a change to brightness, contrast or colour, one should do it on a separate layer. In fact even removing things from the image can be done on a different layer to the original image. The idea behind layered editing is that it is non-destructive (you cannot accidentally damage your image), it is easy to go back and correct an issue further into the editing of an image, and you can vary the amount of change a layer brings by adjusting its transparency. The Theory The easiest way to describe the layer principle is by looking at the below image demonstrating the the idea behind layers. 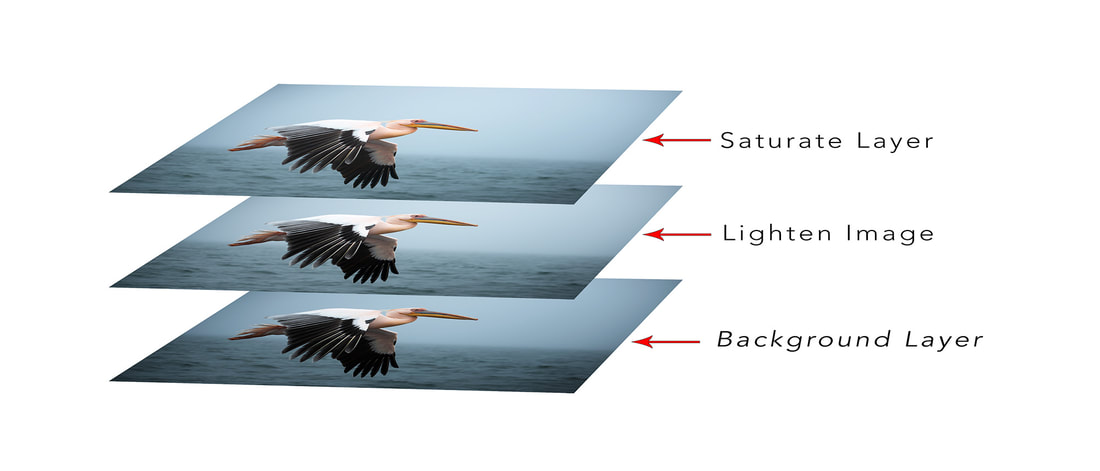 In this example we open the original image into Photoshop. To make a change to the brightness, we duplicate the image into a new layer and adjust its brightness by lightening the image. Next we duplicate this again into a third layer and adjust the saturation. In other words, each change has taken place on a new layer. The problem with the above is that for each layer, the image has had to be physically duplicated. This is far from ideal. So the next concept is to apply the change to a layer without actually duplicating the layer. This is where adjustment layers come into play.  Now, rather than duplicating an image to make an adjustment, the photographer can add an adjustment layer that makes a change to the underlying image as a new ‘imaginary’ layer. The image above demonstrates this. Only one layer actually has an image in this case, the original image, the ‘Background Layer’. The layers above this are the Curve Adjustment Layer (to lighten the image) and the Hue/Saturation Adjustment Layer (to increase saturation of colour). The Doing Let’s put the above theory into practice now. To do so, we need to become familiar with the Layers Palette. This can be accessed (if it isn’t already visible) by going to menu bar at the top and clicking on Window>Layers (you can also access it by hitting the shortcut key ‘F7’ or ‘fn+F7). 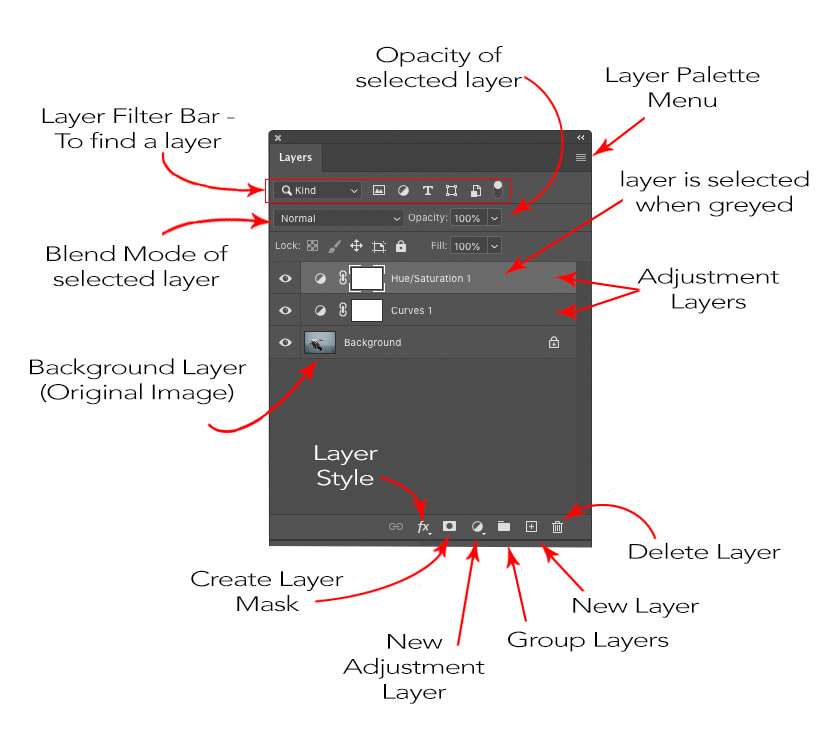 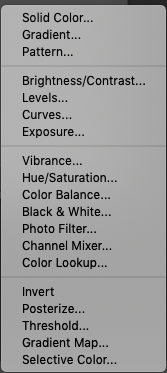 To create an adjustment layer for an image click on the little ‘yin-yang’ symbol at the bottom of the Layers Palette. A pop up menu appears which allows you to select which adjustment you want to use (see image). For simplicity sake, let’s simply use the Brightness/Contrast to make a tonal change to the image. A similar yin-yang symbol appears above the ‘Background’ Layer with a white rectangle next it. At the same time another palette or window appears that shows the adjustments available for the Brightness/Contrast Adjustment layer. Any changes that are now applied to this adjustment are on the layer above the original image, but what you see on the image that you are working on, is as if the adjustment were being applied directly to it. To demonstrate how we can now fine-tune the adjustment you can slide the opacity slider of the layer to the left, reducing the amount of adjustment made to the image by effectively making the adjustment layer slightly transparent. Play around with this by adding different adjustment layers and tweaking how the image looks. This is the basis behind how adjustments are made to an image a layered manner. The next step is to ‘mask’ adjustments so that localised changes can be made to the image (as opposed to global adjustments which affect the whole image). The Theory - Masks In the above example we looked at how changes are made via individual layers. Now, to apply a change to a small portion of the image, we have to find a way to select that portion of the image and apply the adjustment with that selection. This is where masks come into play. A mask is like a cutout of the layer that shows where an adjustment is applied, and hides where it isn’t. 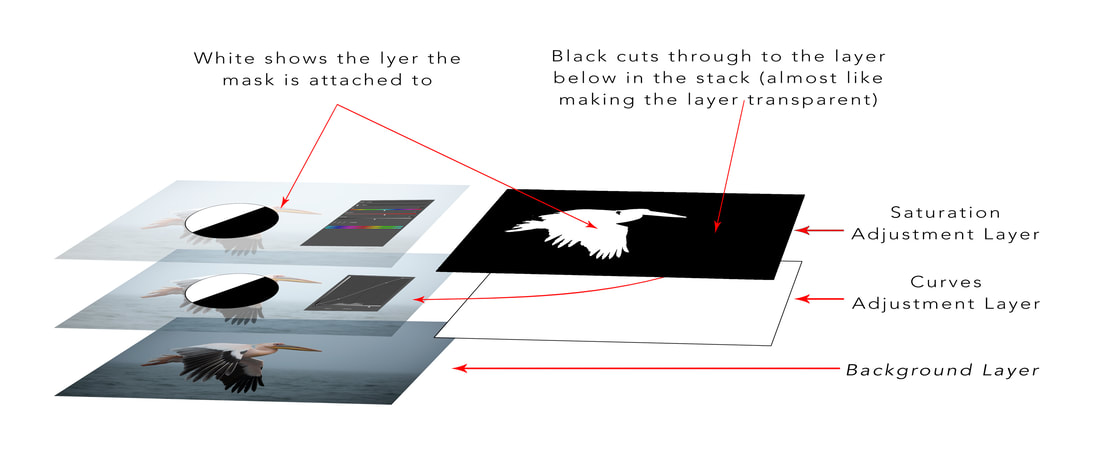 When you add an adjustment layer a mask is automatically created alongside it. This is the small white rectangle to the right of the adjustment layer yin-yang symbol (there is also a small little chain icon that indicates that the mask is ‘locked’ to the layer that it is next to). The principle is fairly simple. The mask is a ‘cookie-cutout’ to show where the adjustment is applied and where it is not. By default the mask is set to white, meaning that the entire layer has the adjustment applied to it. This is shown as ‘white ink’. Notice now that you can select either the mask or the adjustment layer symbol. If you select the yin-yang symbol the Properties Palette shows the adjustment that was selected (in the below example it was a Curves Layer). If you select the mask, then the mask properties (feathering, opacity) appears in the Propoerties Palette. 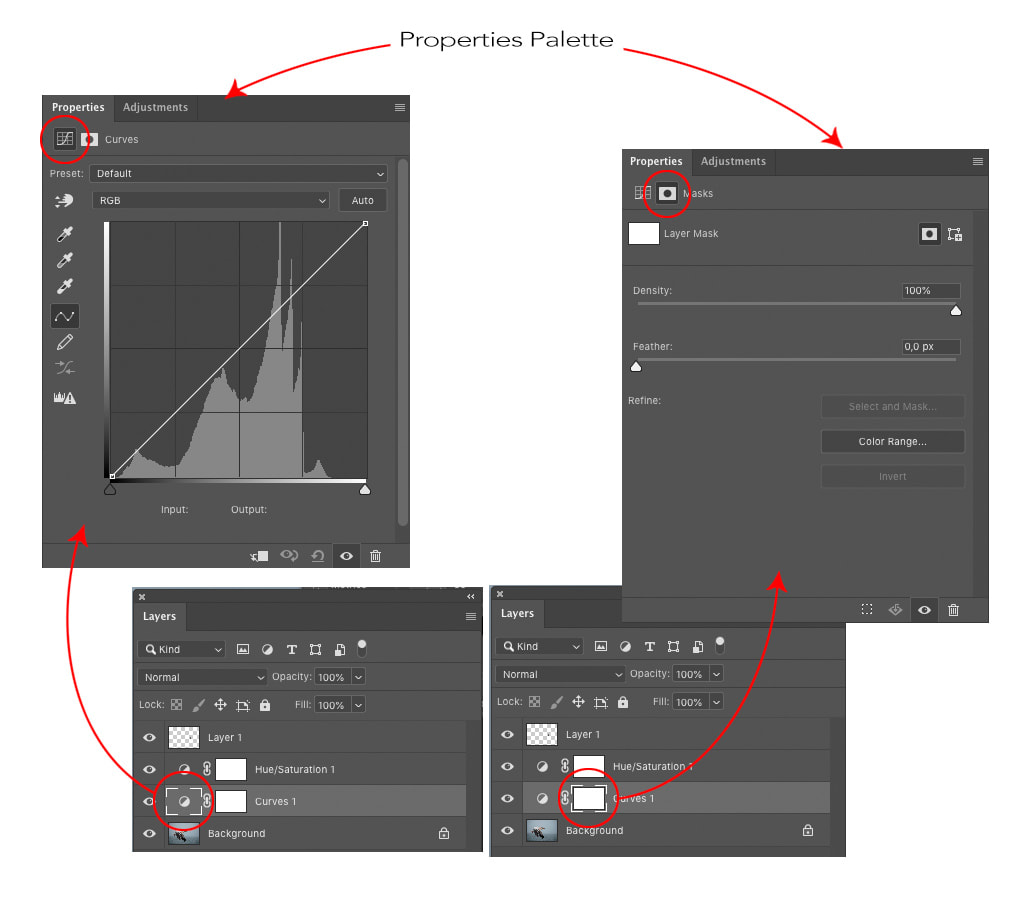 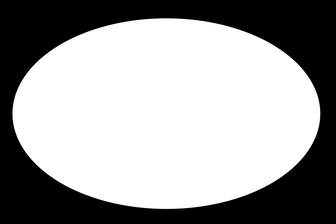 The simplest way to create a mask is to select the mask icon next to the layer in question and then use a brush (shortcut key ‘B’) to paint black ink onto the white mask to remove the adjustment from the image. You can also start with a black mask (the mask is filled with black ink) and paint white ink onto the mask with a brush. Critically, white ink shows the layer that the mask is attached to, while black ink cuts through to the layer below. Some photographers like to use the mantra: ‘White ink reveals, Black ink conceals’ (the layer that the mask is attached to). Example - Creating a manual vignette using an adjustment layer As an example we are going to create a vignette (a darkening of the edges of the frame through an adjustment layer). Step One - Open an Image into Photoshop and select the Elliptical Marquee Tool (to access the Marquee Tool hit shortcut key M, or Shift+M, or right-click on the marquee tool to select the elliptical option). Step Two - Draw an ellipsis around the image so that you get a big circular shape in the centre of your frame. With the marching ants (this is what the flashing little lines indicating your selection are called), click on the create new adjustment layer (yin-yang symbol) int eh layers palette. Instead of a white rectangle the mask next to the adjustment symbol will be a rectangle with a white circular centre and back around it. You can see the actual mask by holding down the Alt/Option button and clicking not he mask icon in Layers Palette. You would see this: Step Three - As mentioned above, white reveals and black conceals. This means that if we were to make any changes it would only show in the white portion of the mask. We need to invert the mask so that so that the white is on the outside and the back is on the inside (we could have done this initially by holding down the Alt/Option button while clicking on the New Adjustment Layer icon). The easiest way though is just to select the mask icon and hit Cmd/Cntrl+I (or go to Image>Adjustments>Invert). 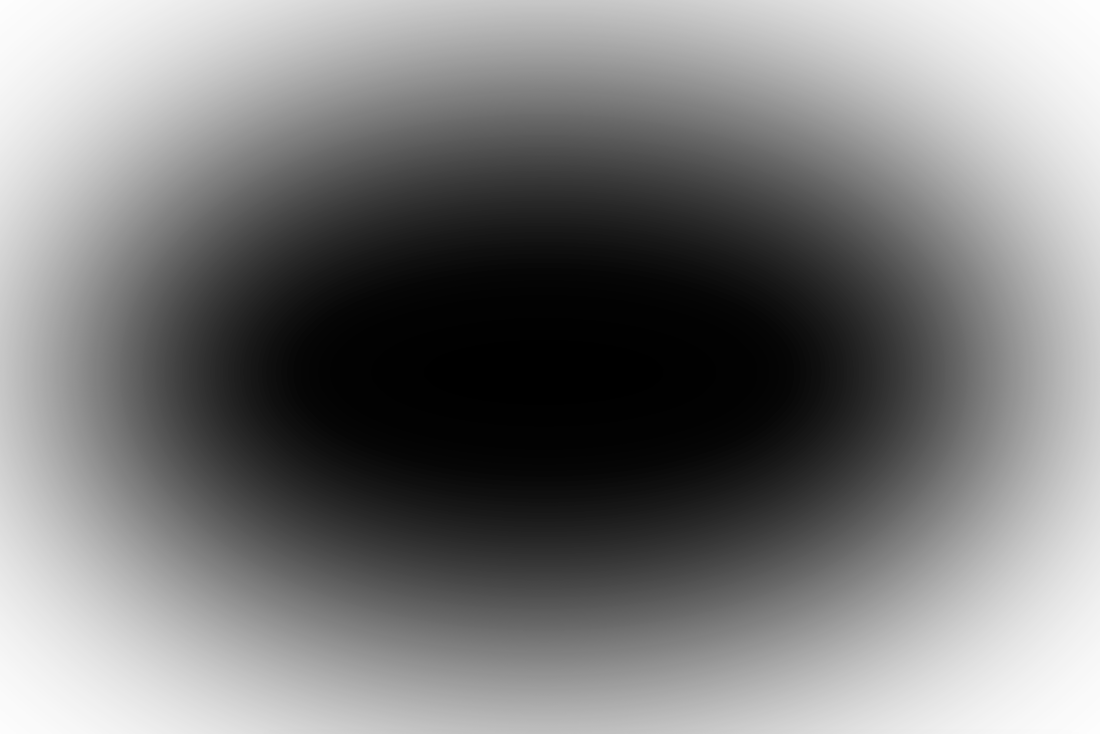 Step Four - Using the Levels Adjustment palette (click on the adjustment icon to get off the mask) darken the image by pulling the middle grey slider (the middle triangle) to the right. You will see now that the outer portion of the image becomes darker, but with a very defined edge to the transition.
Step Five - Now to feather the transition. Select the mask again and notice that the Properties Palette (by default this should be in panel attached to the actual Adjustment, but if it isn’t you can access it by going to Window>Properties), replaces the Adjustments Palette. Now just grab the Feather slider and drag it over the right, effectively softening the mask edges. Going Further This article only looks at the actual principle behind using layers and masks. The next step is to be able to make better selections of the subject matter that you are wanting to isolate and apply adjustments to. You can start by looking at this tutorial on the basics behind creating selections (http://www.photowriting.co.za/2015/10/basic-selections-in-photoshop.html). The primary takeaway from this article is that when working in Photoshop all changes and adjustments made to an image should be done using a layered method. Once you can get your head around the concept of layers and how to mask through isolated selections, the world of Photoshop suddenly becomes a lot easier to navigate, and make work for you.
2 Comments
|
Nature's Light
|
 RSS Feed
Services |
Company |
|