BLOG
|
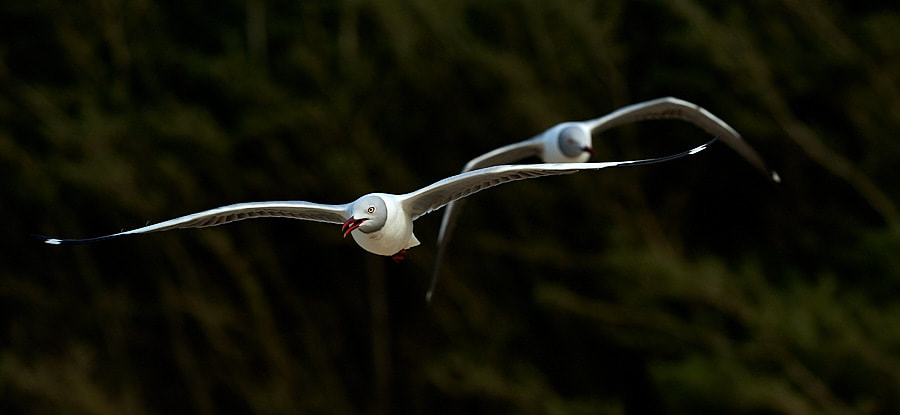 The number one reason why images fail, is focus (possibly it’s a tie between that and poor composition, but even the latter can be excused by some as art 😉). There’s that gut twisting realisation when you are going through the images from a shoot only to realise that the focus was out. What could have been fantastic, gets added to the trash pile. We now have blistering fast auto focus, face detection, dynamic tracking, 3D tracking, a gazillion focus points, micro-tuning (automatically calibrated on some cameras even) and more. You’d think that it would be as simple as pressing a button and shooting. But it’s not. Although we can get passably sharp results almost every shot, we still miss critical focus from time to time (if not more occasionally) and it is mind-numbingly frustrating! There are a number of things we can do to try and improve focus when we are shooting, whether it’s shooting a landscape, a moving animal, or a close-up. I personally feel that correcting focus falls under these three broad categories of; Calibration, Settings and Technique. Before starting with calibration though, one needs to first identify the difference between ‘softness’ as a result of poor focus, and blur as a result of camera shake. I am often presented an image and asked by the photographer how to improve the focus. The problem is that on inspection there is absolutely nothing wrong with the focus, but rather that the image suffers from ‘camera shake’. Either the shutter speed was too slow for the camera to be effectively hand-held (rule of thumb for full frame cameras has been to select a shutter speed close to the actual focal length being used: with a 500mm lens a shutter speed of 1/500th of a second or faster is required, if a 24mm lens, then 1/30th is theoretically possible, but the recommendation is to stay above 1/125th of a second for hand-held shooting), or the camera has not been in a stable position to start with. If you are shooting a landscape you really should be using a tripod (I know that’s a swear word to some people). If you have the right stability and appropriate shutter speed for the image in question, and it is still soft, then you can turn your attention to calibration, settings and technique. 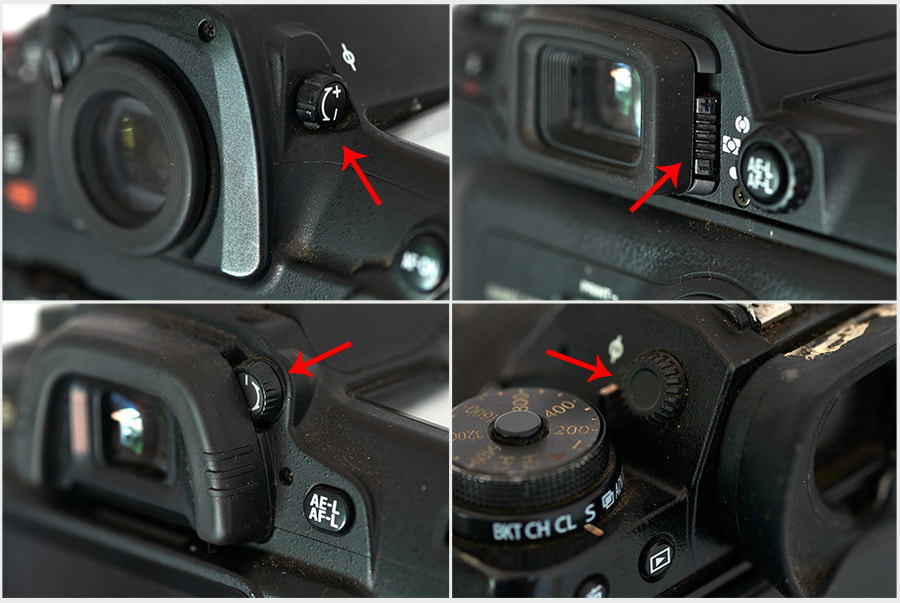 Calibration The first thing to be aware of when calibrating your camera is that of the viewfinder (both on traditional DSLRs and on the newer breed of mirrorless cameras with electronic viewfinders). Just about all viewfinders have a diopter correction built in (certainly this is the case for modern digital cameras). I have on numerous workshops discovered that the diopter was incorrectly set on a photographer’s camera, often to the point that they were peering into a viewfinder that was completely out of focus for them. If you can’t see through the viewfinder correctly, then you cannot gauge whether the autofocus is correct (or needs its own calibration potentially). It’s very simple to set up the diopter. Pop the camera on a tripod and use live view to focus on a book shelf (you want a subject that is flat with decent contrast to focus on). Once you know it is in focus, switch off live view and look through the viewfinder. Slide or rotate (depending on the adjustment style for the camera involved) the adjustment control for the diopter correction until the image is in focus. If the diopter gets knocked out of position in the field you can also do a rough adjustment by looking at the information displayed in the viewfinder while adjusting the diopter correction (like if the diopter gets accidentally knocked while on a game drive). It’s not perfect, but it can get the diopter close to accurate without resorting to a flat surface to focus on and a tripod to hold the camera. Then there is option to calibrate the lens itself. All cameras and lenses are built within a range of tolerance. This means that the lens might be on the edge of what is considered accurate calibration. It could also mean that a particular lens and camera combination might not work optimally. This is particularly the case if one considers that we are sometimes using lenses and cameras that are manufactured literally decades apart (I think of my 1986 era 105mm macro lens attached to my D850 which came out two years ago while writing this). Camera manufacturers now allow us to fine-tune or calibrate the focus on most cameras apart from the most entry level. It’s a worthwhile exercise reading the manual for the camera and going through the steps to fine tune the focus for all of your lenses. In some cases the results are truly surprising (as in you had no idea how badly inconsistent the focus in your images was prior to calibration images were). 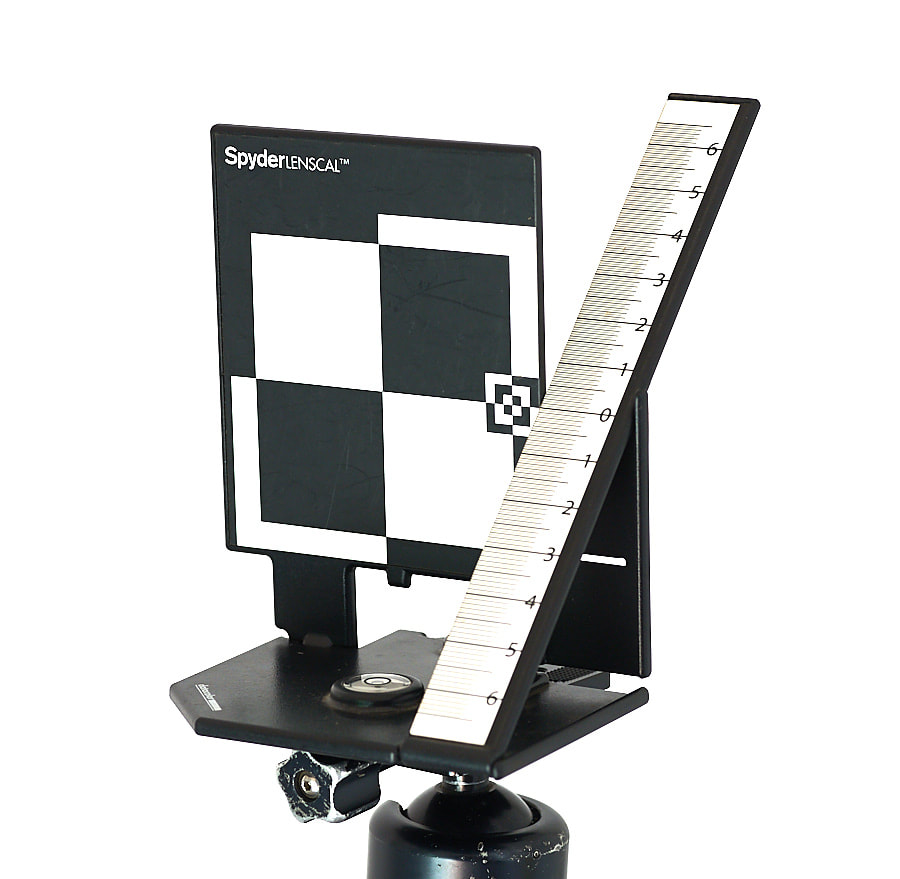 There are several calibrating tools available, of which the most frequently used on is something called the LensCal by DataColor (the same company that makes the Spyder screen calibrator). The idea behind it is that you set up a target and use the Autofocus to focus on this. The target has a markings on it to help figure out whether the camera lens combination is front focusing (focus point is just forward of the actual subject) or back focusing (focus point is just beyond the actual focus point). The photographer can then use this information to adjust the focus for a particular lens by essentially biasing it in the opposite direction. It can be time consuming but is certainly worth the effort as more consistent and accurate focus is usually the result. If this continues to result in poor focus you can also send a lens back to the manufacturer for recalibration, although this often just sets the lens back to it’s default, which doesn’t necessarily solve the problem. Calibration Solutions
Settings A more likely reason for poor autofocus has to do with the settings that we use rather than the calibration of the lens. Our cameras have a vast number of settings that can be used to improve focus consistency. The problem is that most photographers never actually delve into the nuances of the focus menu. For good reason too. If I look at the menu tree for autofocus on my Nikon D850 there are 12 separate subfolders each with there own set of parameters. These settings range from the fairly simple ‘which button activates focus’, to the far more complex decision as to how the autofocus should react to a tracked subject being blocked by another object, and whether the subject is moving erratically or steadily (so think the difference between a gull swooping in the air against a cliff face to a race horse galloping down the last mile - the former is erratic while the latter is fairly constant). The problem the average enthusiast (and even professional) photographer has, is that the settings for one type of photography don’t necessarily match all types of shooting that they are likely to encounter. The result is that the photographer doesn’t adjust the settings in the first place (thankfully the camera manufacturers have a done a reasonable job in getting the default settings to a state where they work for the most part).  The bewildering array of choices presented to the photographer when they start to menu dive into the autofocus settings The bewildering array of choices presented to the photographer when they start to menu dive into the autofocus settings At the very least though, photographers should be able to navigate the very basics of autofocus. These are the focus mode, and the use of focus points and whether those focus points are dynamic (tracking) or not. For a start, most autofocus digital cameras can be set between what is loosely defined as single servo and continuous servo autofocus. On some focus selectors you will see the letters S, C and M, which refer to Single, Continuous and Manual focus (Canon refers to the same settings as One AI-Focus, AI-Servo and One-Shot for their version of auto selection). The basic difference between single and continuous focus is that the camera focus locks onto a subject and stays in place with single focus, but attempts to move with the subject in continuous. In single focus most cameras actually lockup if the subject moves out of focus before you fully depress the shutter button (in the days of film it was there as a safety measure so that you didn’t needlessly waste frames when the camera was out of focus). The rub is that the sensors used for single and continuous are slightly different, with the single focus being more accurate than continuous. So, if you are shooting a landscape you are likely to get better focus if you set the AF to single servo. If your subject is moving, you are more likely to get better focus if you set the AF to continuous servo (my personal recommendation is to ignore One-Shot on Canons and AF-A on Nikons - these are the auto settings that are supposed to tell the difference between a static subject and a moving one, but don’t always succeed in my opinion and are more likely to add to your frustration than solve it). Then there is the complication with focus points. Some cameras have an extraordinary amount of focus points to choose from. This again results in many photographers simply not using them, or not understanding how they can be used. The simplest way to approach the focus points is to realise that the focus points can be moved and the most accurate, sensitive one is the centre point (some of the more advanced focus systems have several cross-type autofocus sensors, but most remain the simpler uni-directional or vertical/linear type autofocus sensor (see the box on how autofocus works). How Autofocus Works Most SLR camera autofocus systems use a combination of Phase Detect and Contrast Detect sensors to gauge whether an image is 'in focus'. The first is to focus a lens. What this essentially does is judge contrast within a very small area. The theory is that a subject in focus has more contrast than one that is out of focus. The sensors themselves can only really see contrast in one direction, apart from some ‘cross type sensors’ that see contrast in perpendicular directions. If the chosen sensor ‘sees’ contrast in a vertical line and you point it at a subject consisting of predominantly vertical lines (like a plantation of trees, or bars in a balustrade) there is the possibility that the focus will hunt as it can’t ‘see’ the contrast. A trick here is to angle the camera slightly so that the sensor is effectively at a diagonal, and then it will ‘see’ the vertical contrast. This is also why the camera sometimes locks up when photographing an object where the focus point is positioned over something that has no defined contrast (like the sky, or a blank page). Moving the focus point is only part of the decision making though. The more advanced the camera, the more choices you have to make to get the focus spot on (the advantage is with practice you are more likely to get that focus spot on). Focus points can be set to Single, Dynamic (Canon calls this Focus Point Expansion) and Tracking, and now also Group. With mirrorless cameras and several DSLRs we also now get Face Detect which is supposed to identify where the subjects eyes are and follow them (it doesn’t always work and can also lock onto the wrong eye - the one furthest from the camera). Without focusing on a particular brand, these are the basics around the selection of focus points. Single Point - Selects one point and only uses this point for focus (it will track focus if set to continuous servo, but only on the point that is selected). It is by far the most accurate focus (apart from manual) but has to be kept on the subject in order to work. Dynamic - The photographer must still select a focus point, but the surrounding focus points are also active (cameras usually give the option as to how many focus points are also activated). If the subject trays from the initial focus point, the surrounding focus points will activate and attempt to keep the subject in focus. Importantly the initial focus point doesn’t change or move. 3D Tracking - Nikon started with this particular setting and it has been adapted and adjusted by other manufacturers, but they all work in a similar way. It utilises colour RGB information to assess the scene and focus subject. The idea is that the actual focus point will bounce around to follow the subject once initial focus has been acquired. It is quite amazing how the focus tracks along with the subject, but it can be confused by busy backgrounds. Overall though, it is excellent for photographing erratically moving subjects, but maybe not as accurate as Dynamic points when used by an experienced photographer (but amazing for photographers still getting to grips with autofocus). Group - This last point selection is a little bit of both dynamic and 3D thrown together. The group gives an array of focus points that are activated, but the focus is on the closest subject to the centre point. On some DSLRs activating Group mode with single servo automatically sets the camera to Face Detect. Learning how to use the focus points takes time, but with practice can yield much improved autofocus consistency. 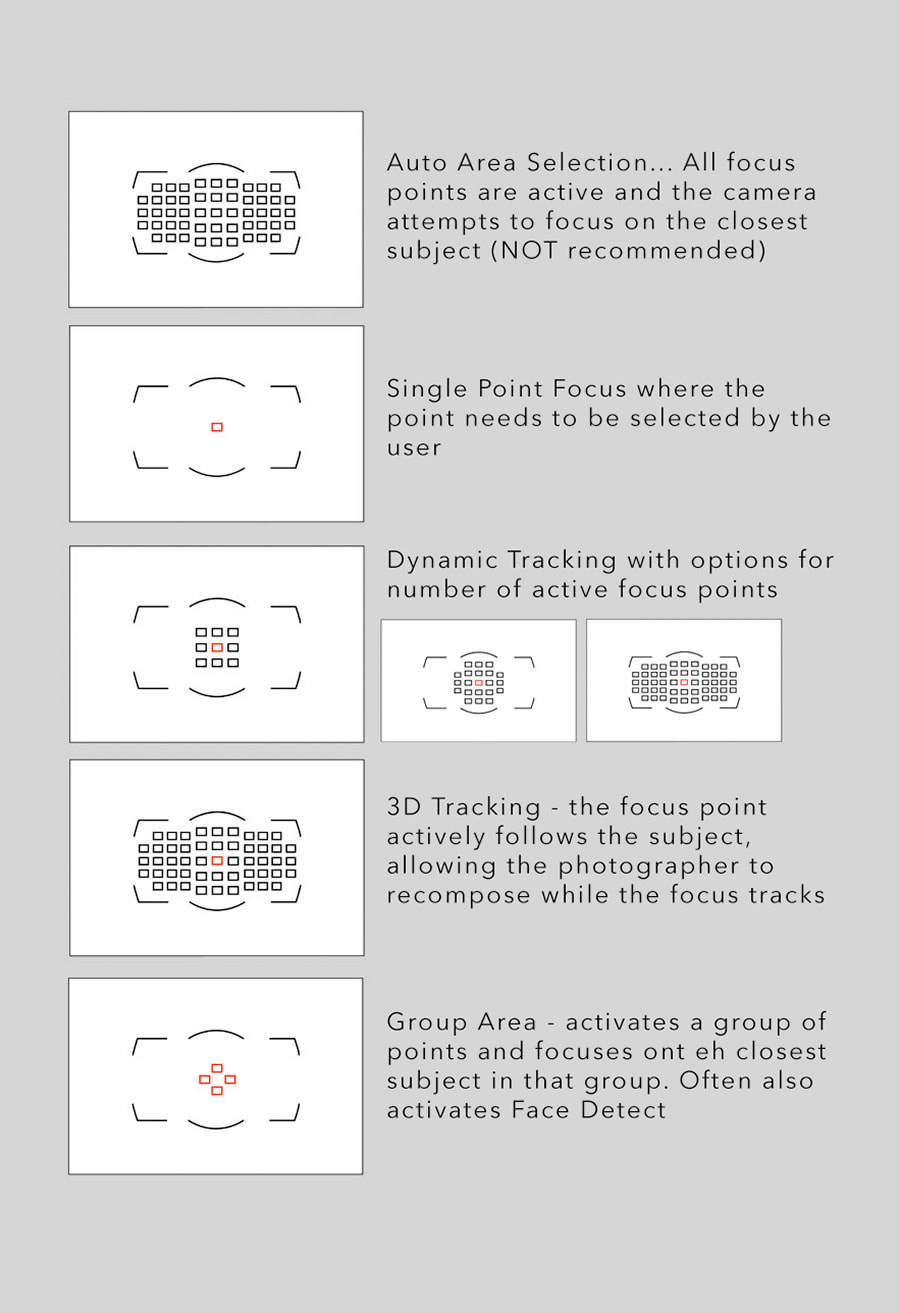 Setting Solutions
Technique There are a whole plethora of techniques out there to get spot on focus. I’m going to try and keep it fairly simple here though. For a start, don’t be afraid of manual focus. By far the most accurate way to focus a camera is through the use of manual focus in conjunction with live view. If you are doing landscape or still life work there is literally no better way to ensure accurate focus. I even travel with a large micro-fibre towel in my camera bag so that I can throw it over my head in order to see the rear LCD screen better (as in the way that photographers used to compose the old large format cameras). The advantage of this is that most digital cameras give you a live-view stream that includes the depth of field effect. This means that you can effectively focus so that all the elements that require focus are in focus (essentially hyperfocal focusing without the use of the hyperfocal scale). In the past we would all have had to learn how to and be comfortable with using the depth of field preview button, My finger used to almost permanently be jammed down on it during portrait shoots when I was shooting film. It was really the only way to judge where focus fell at the different apertures and helped ensure that eyes were in focus. The distinct advantage that mirrorless cameras now have is that you are effectively viewing the effect of aperture, and therefore of focus, constantly. This is a huge boon to accurate focusing. Mirrorless cameras also have other tools that are unique to the electronic viewfinder. In particular, focus peaking and focus magnifier are amazing additions that ensure pin sharp focus when used properly. Focus peaking is something brought over from video cameras and creates a highlighted line wherever the sensor sees focus contrast. The magnifier is then one button way (sometimes it is activated when you turn the focus ring) to zoom into the view to better see the focus on the subject. These techniques will also work on Live-View when using the rear LCD screen on most DSLRs. Don’t focus on the horizon line. It’s very easy to get trapped into focusing on the distant mountains, or even just slapping the focus in manual focus over to infinity. Unfortunately this means that the foreground elements might potentially be soft, or at the very least, not as crisply sharp as they should be (as an aside you are likely to find conflicting advice on this on the internet with some writers urging that focus on infinity is the best technique while others claim that infinity can be slightly out of focus as that is natural for our vision). Rather, if you are in a bind, I find that the old advice of focusing a third of the way into the scene is the most effective (if you are using a relatively deep depth of field). Of course if you are using a shallow depth of field then make sure that the subject you want in focus is focused on. Which leads to the actual depth of field. I found it interesting listening to the award winning South African Wildlife Photographer Greg du Toit when he pointed out at a lecture that most of his images were shot at f8. This, he explained, was so that there would be sufficient focus for animals to have their face sharp, or a passable range of focus when the animal is moving. So yes, wildlife photographers might have the exotic f4 and f2.8 telephotos, but that doesn’t mean you always use the wide open apertures. On the flip side of this, using a tiny aperture like f22 is also not going to work and will result in soft images. This is due to diffraction limitation. Basically this means that beyond a certain aperture the light rays become dissipated slightly and the image starts to defocus (there is significantly more detail on why this happens in this article). To complicate matters, the higher the resolution of the camera, the more likely you are are going to have Lenses that are diffraction limited. As a general yardstick though, APS-C type cameras will likely start showing the effects of diffraction limitation at about f8, while full-frame cameras can sometimes reach f11 before diffraction limitation becomes obvious. Still on the general rule of thumb (so not always true) a lens is usually at its sharpest two stops from wide open (so an f2.8 lens is probably at it’s sharpest at around f5,6). 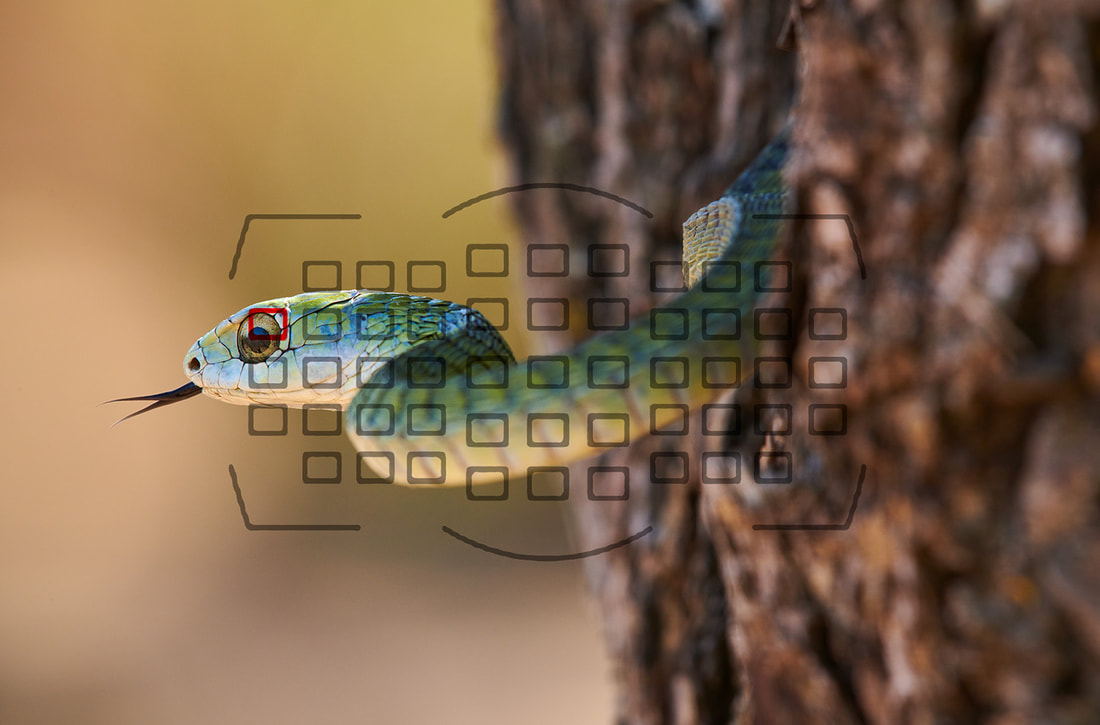 An image of a green Boomslang showing the selected focus point on the left edge of the focus points A particularly useful technique if you are using autofocus on moving subjects is to learn how to use back button focusing. What this does is disables autofocus on the shutter button and relegates it solely to the rear AF-ON button (the AEL button can usually be reprogrammed to be the AF-ON button). This means that the auto focus on most modern autofocus lenses - but not all - can then be over ridden into manual focus. The advantage of this is that the photographer can choose when to autofocus and when to fine-tune that focus manually without having to menu-dive or change settings. Essentially it means that the camera is in full time manual focus override. A classic example of this use would be when photographing wildlife. Imagine photographing a lion that is partially hidden by grass or thicket. The camera’s autofocus might get confused by the foreground elements, causing the lion to be out of focus. If the focus hunts, or needs to be fine-tuned, simply lift your thumb from the AF-ON button and manually tweak the focus. Since the autofocus is not linked to the shutter button it means that the focus won’t jump or hunt when you actually depress the shutter. If you then have to follow focus as the lion moves away you can jam your thumb back on the AF-ON button. If the camera is set to continuous servo it will then try to track focus with the moving animal (but you can step in at any stage to assist with manual focus). Conclusion Focus is hard, but it doesn’t have to be. Manual focus is always going to give the best results. If you are on a tripod and have Live View, you can be guaranteed of accurate focus. It gets more complicated when we leave the tripod and start to rely on the camera’s sensors. I try to approach autofocus like this: Is the subject moving or still?
Other photographers might have other advice admittedly (I met a wildlife photographer who swore that the best technique was One-Shot, single point for moving subjects with his Canon camera; the exact opposite of how I shoot), but I find that this works well for my own photography. The answer, as always, is to experiment and see which technique works best, or feels the most comfortable, to you.
0 Comments
Leave a Reply. |
Nature's Light
|
 RSS Feed
Services |
Company |
|