BLOG
|
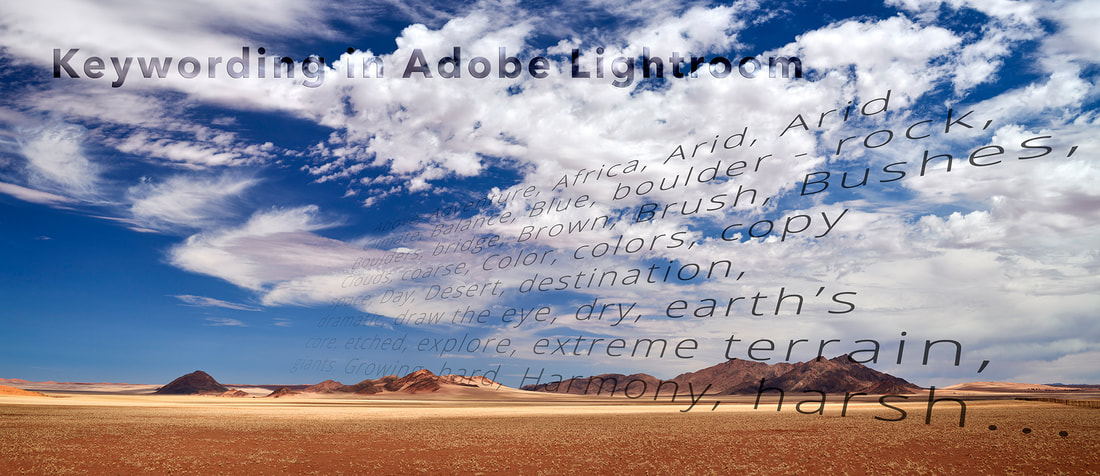 Lightroom has a killer feature that seems to often get overlooked by people who use it - Keywording. Maybe it’s because keywording is the least sexy part of the image pipeline. Yet it is an extraordinarily important part of every photographer’s workflow, and one that is not given nearly enough attention as it should. Keywords are by far the best way to find photographs when you have a large number of images that need to be sorted through. Lightroom continues to be one of the easiest ways to add keywords to an image, and one of the fastest ways to fin an image in a vast library, so long as you have actually keyword the images in the first place. What is Keywording? Keywording is basically adding textual information to the metadata of the image. In much the same way that hashtags help us search through images on social media, keywords allow us to search for images in an image library. In fact, thanks to hash tagging the concept of keywording is far more familiar to photographers than it was a decade ago. The essence of good keywording is to describe the content of an image in single words that will ultimately be used to categorize the image in a library. The simple rule of ‘Who, What, Where and When’ first order of keywording, followed by ‘How and Why’. The only odd one out is ‘Why’ which is actually a placeholder term for any abstract concept that the image could be used for, but that is more for keywording for stock libraries than for keywording so as to find an image.  So the image of the Zebras would potentially have as first order keywords: Animal, Zebra, Herd, Wildlife for the ‘What’ category. ‘Where’ would be: South Africa, Kwazulu-Natal Province, Thanda Game Reserve. For the ‘When’, Day, Late Afternoon, Dusk could be added. You could also add the actual date, but this is already included in the metadata of the camera, so is essentially unnecessary as a keyword. The more difficult categories tend to only be necessary for photographers wanting to sell their work in a photographic stock library. ‘How’ keywords would include things like ‘Eye-Level’, ‘Telephoto Lens’, ‘Compression’, ‘Distance’ as well as “Into the Light’ and 'Contre-Jour’. The ‘Why’ are the most difficult as they are meant to be abstract concepts that link the image to a particular use for potential image buyers. So the image of the zebra grouping could be anything from ‘Safari’ and ‘Adverture Holiday’ to ‘Family Bonds’ and ‘Alertness’. If you are only using keywords to organise and find images in your own library, then the amount of keywords required is actually minimal and an entirely personal choice. If you would like to go into selling images as stock, then reading the far more complete Getty Images Keywording Guide would be a good start. This is NOT required if all you need to do is find your images in your own library. Keywording In Stages There are three levels of keywording that I use: Ingest, Basic Edit and Image Output. Essentially they refer to when the images are keyword in the image workflow, so that the least amount of time possible is used to effectively keyword images for searchability. First Stage: The first keywording happens on ingest of the images into Lightroom (although just about all RAW editors that do import tasks allow this). On the right hand side of the ingest dialogue is a drop down menu title ‘Keywording’. Good workflow management starts the keywording process by adding ‘global’ keywords at this point. A ‘global’ keyword is a keyword that applies to the entire import. If all of the images were taken in a specific location, that location could be a keyword. If all of the images have the same model in them (in the case of a fashion shoot), her name would be a keyword. If all of the images incorporate a coastline (for instance shooting the dawn at Moyo’s Pier in Durban, then global keywords could also be ‘shoreline’, ‘coast’, ‘Indian Ocean’ etc. 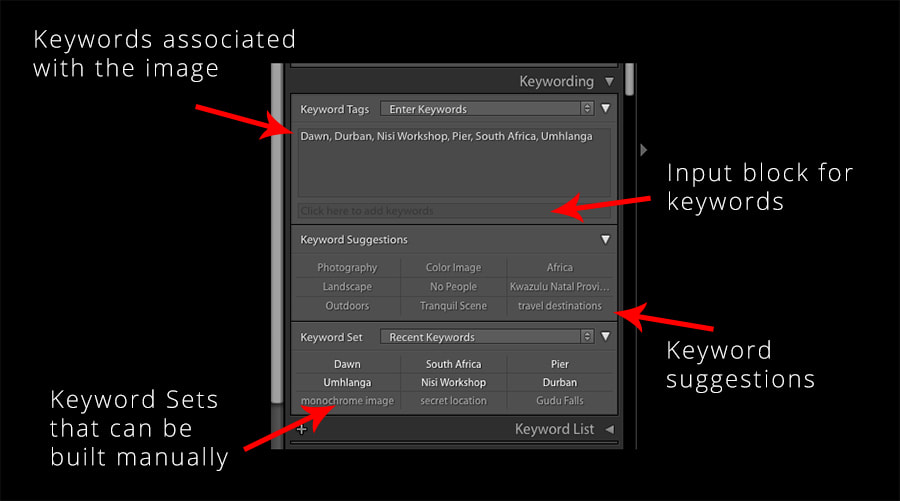 Second Stage: Once the images are ingested into Lightroom, the basic edit of the images starts. This edit involves culling the rejects, selecting favourites and sorting the images into relevant collections and folders etc. What it should also involve is more specific keyboarding. This is also where Lightroom starts to show its hidden superpower with keywords. In the Library Mode on the right hand panels are drop down panels ‘Keywording’ and ‘Keyword List’. The keywording panel is where the magic happens. All you have to do is select an image, or a group of images (hold Cmd down on a Mac, Cntrl for a PC, and click on the images you would like to keyword), and tap in the keyword you would like to add to your image. The larger of the blocks in the Keywording panel shows the keywords that are already associated with the selected image. If there are multiple images selected and some already have keywords, an asterisk will sit next to a word, meaning that some but not all of the selected images have this keyword. You can type in keywords directly into this larger block, or the smaller block below (where it actually prompts you to type in keywords). You can add more than one keyword at a time by putting a comma between (comma + space) the keywords. Each keyword that you add also goes into your keyword library which you will see slowly growing in the Keyword List below. 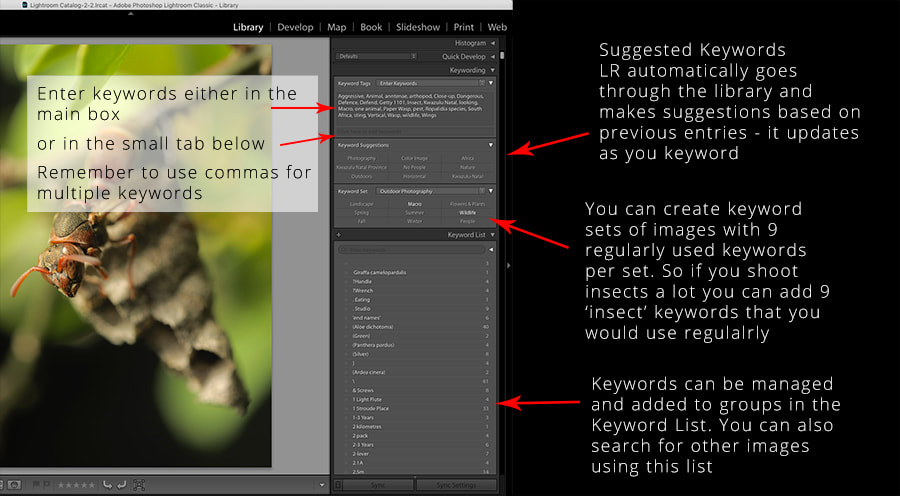 As your Keyword List grows, Lightroom begins to start making suggestions of keywords for the images that you select. The Keyword Suggestions continuously update as you add keywords. It does this by searching through images in the Library that have similar keywords. Instead of typing images in, you can simply click on them (they turn white and then disappear from the suggestion list, but pop up with the other keywords that are associated with the image). This is by far the fastest way that I have ever come across to keyword images. However, it relies on the fact that you do actively keyword images to start with. Unless keywords have actually been created, there is nothing for Lightroom to suggest in the first place. 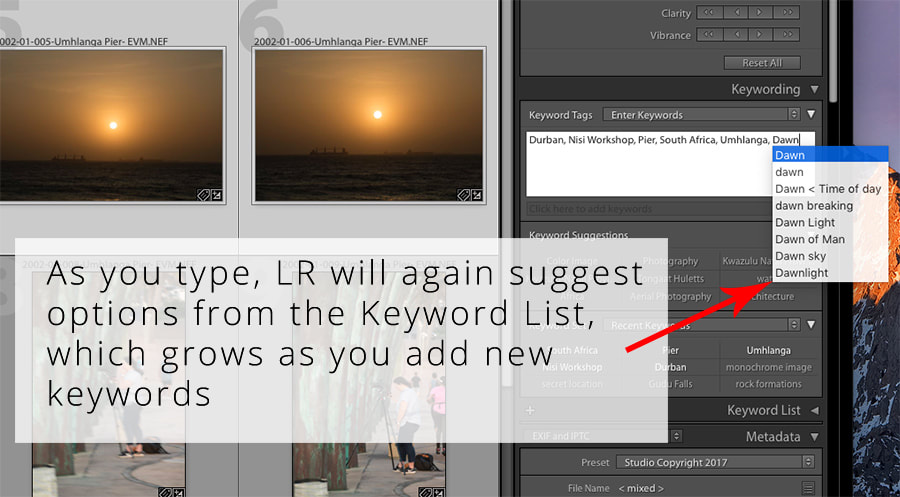 Taking it further you can also start to edit actual keywords in the Keyword List. In particular you can start to add synonyms, as well as create a hierarchy tree of keywords. Creating a synonym means that if you add a keyword to an image, any synonyms will be automatically added as well. Using the Hierarchy tree is similar. To create a Hierarchy tree you can add a keyword to the keyword list, such as ‘Wasp’. Create a second keyword, ‘Paper Wasp’ and then drag that keyword with the mouse over the ‘Wasp’ keyword. You now have a hierarchy so that if you type in ‘Paper Wasp’, ‘Wasp’ is automatically added to the image, but adding ‘Wasp’ doesn’t automatically add ‘Paper Wasp’. To create a synonym for a keyword, double click on the keyword in the keyword list and a new pop-up dialogue appears. You can now type in any synonyms that you would like to appear when you select the original keyword. A good example of this is Latin names of animals and plants. If you add the Latin name as a synonym for the common name, then it will automatically keyword the Latin name whenever you add the common name as a keyword. 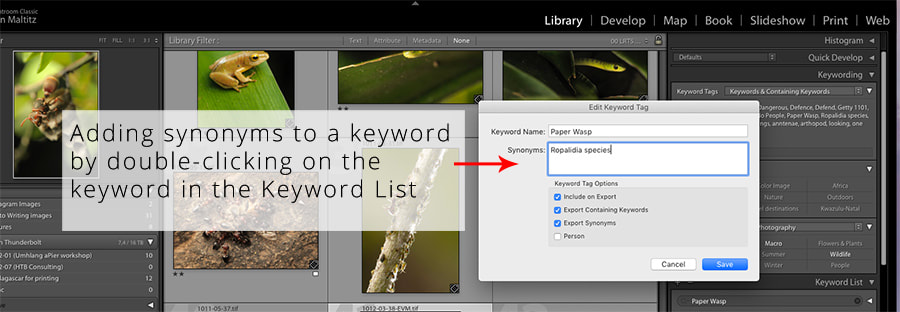 Third stage - Output Stage: Technically calling this the output stage is incorrect as the keywords aren’t applied when you export the image. Rather this is something I personally do. The first two stages of keywording - global keywords on ingest and specific keywords during edit - should be the Who, What, Where and When keywords. You actually don’t need to go further than this if all you want to do is be able to find your own images in your own library. If you want to do more with your images, such as submit them for image stock libraries, then you need more than just the basic keywords and have to apply keywords that give ideas as to the mood of the image, atmosphere and abstract concepts such as love, harmony, anger, etc. Stock libraries also have concepts such as ‘At The Edge Of’, ‘Looking Forward’ and ‘Development’ etc. These are the difficult keywords that take a lot of time to add and are only necessary for a small percentage of photographers. I only approach these keywords once the image is completely processed and is ready to be output to the client (if the client even needs the keywords in the first place). Add these keywords in exactly the same way as second stage keywords. Where The Real Magic Happens Once images have a basic set of keywords, the real magic happens in being able to find them with a few keystrokes. Rather than searching through folders and collections to fin a specific image, select ‘All Photographs’ in the Catalogue Panel (top left panel in Library Mode). Above the stage (where the image is) is the Library Filter Bar (if it isn’t visible hit the backslash ‘\’ button which hides or reveals the bar). Select the Text option and type in the keyword you are looking for. Depending on the number of images in your Lightroom Catalogue, it a should a few seconds or more to start populating the stage with a grid view of all the images that have the specified keyword. 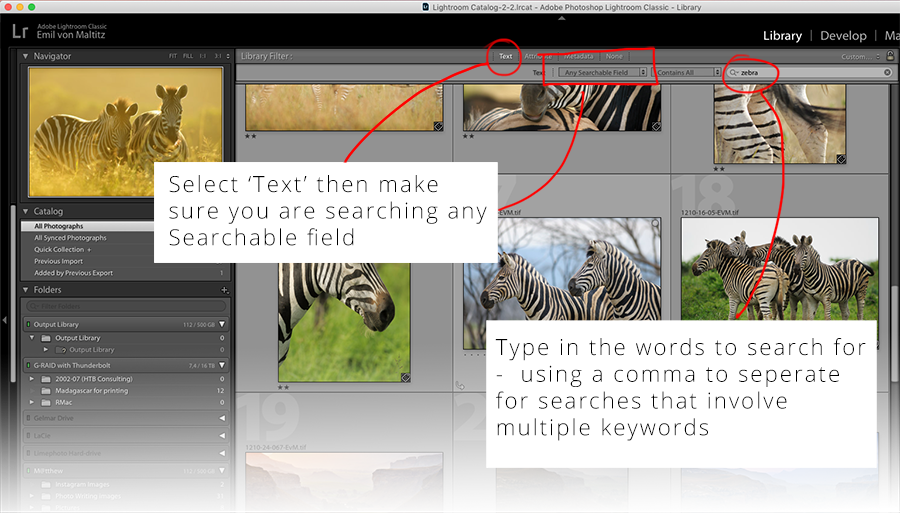 You can refine your search through the drop-down menus in the Filter bar, but the basics are fairly simple. If you have actively keyword images, then they can easily be found using the text search option. To say that this removes hours of searching is an understatement. In my opinion, this is Lightroom’s real superhero power; the ability to easily keyword images, and search using those same keywords to find images.
0 Comments
Leave a Reply. |
Nature's Light
|
 RSS Feed
Services |
Company |
|