BLOG
|
- Home
- Photography Courses
-
Photography Tours & Workshops
- South Africa >
-
Africa Workshops
>
- Uganda Private Wildlife Photography workshop
- Morocco - Meandering Morocco - 10 Nights
- Botswana - Photographing Giants - Botswana 5 night astrophotography workshop
- Lesotho - Expoloring The Mountain Kingdom - 6 night Landscape Workshop
- Namibia - Namibia's North - 13 Nights
- Namibia - Composing the Dunes - 14 Days
- Madagascar - Exploring the Island Continent - 15 Days
- Europe & the North >
- The 'Where To Next' Survey
- About Us
-
Gear Sales
- Leofoto
- Leofoto Flagship Tripods
- Leofoto Accessories
- Leofoto Mini Tripod & Smartphone
- Leofoto Monopods
- Leofoto Quick Release Plates
- Leofoto Ranger Tripods
- Leofoto Leveling Ranger Tripods
- Leofoto SOAR/PRS
- Leofoto Summit Tripods
- Leofoto Tripod Heads
- NiSi
- NiSi 100mm
- NiSi 150mm
- NiSi M75
- NiSi SWIFT Filter system
- NiSi Circular Filters
- NiSi Close Up Lens Kit NC 77mm
- NiSi Drone Filters
- F-Stop Questionnaire
- Blog
- NiSi SWIFT Filters
|
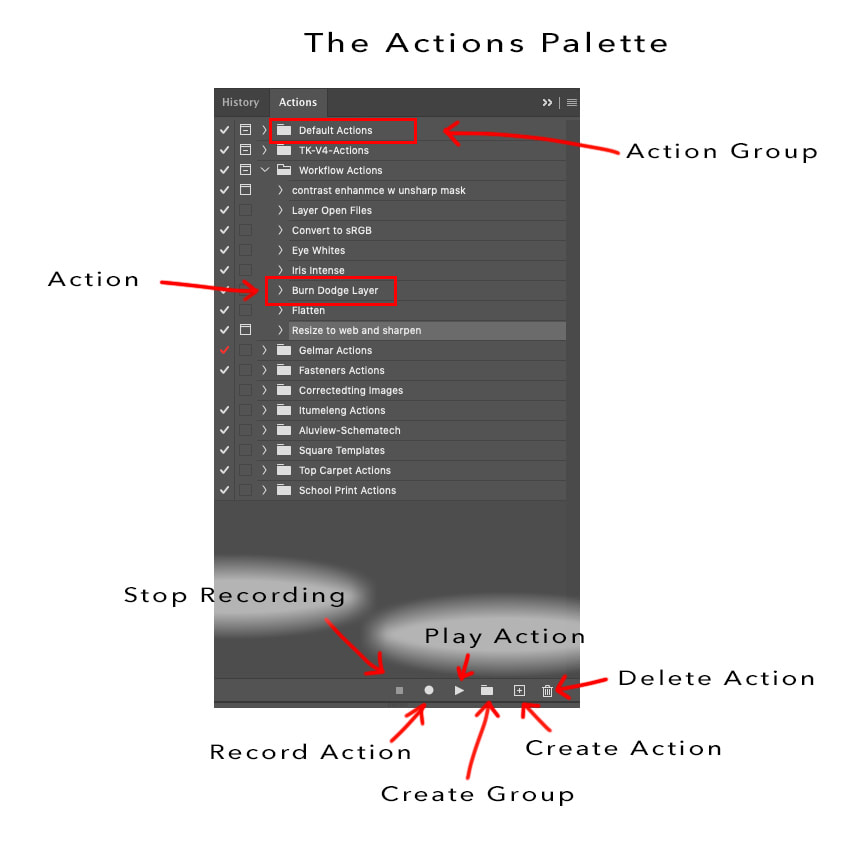
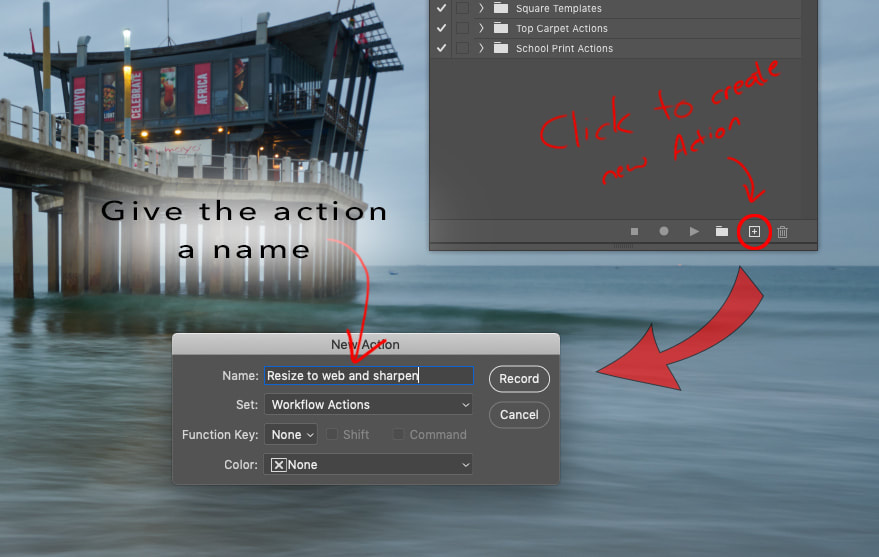
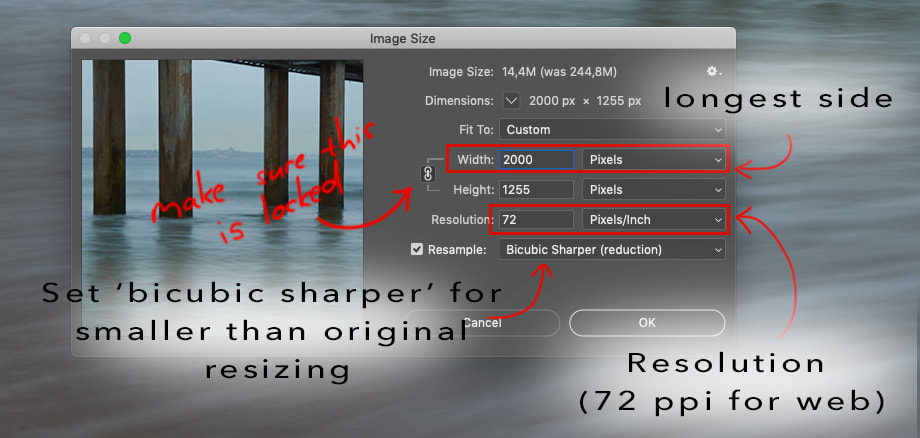
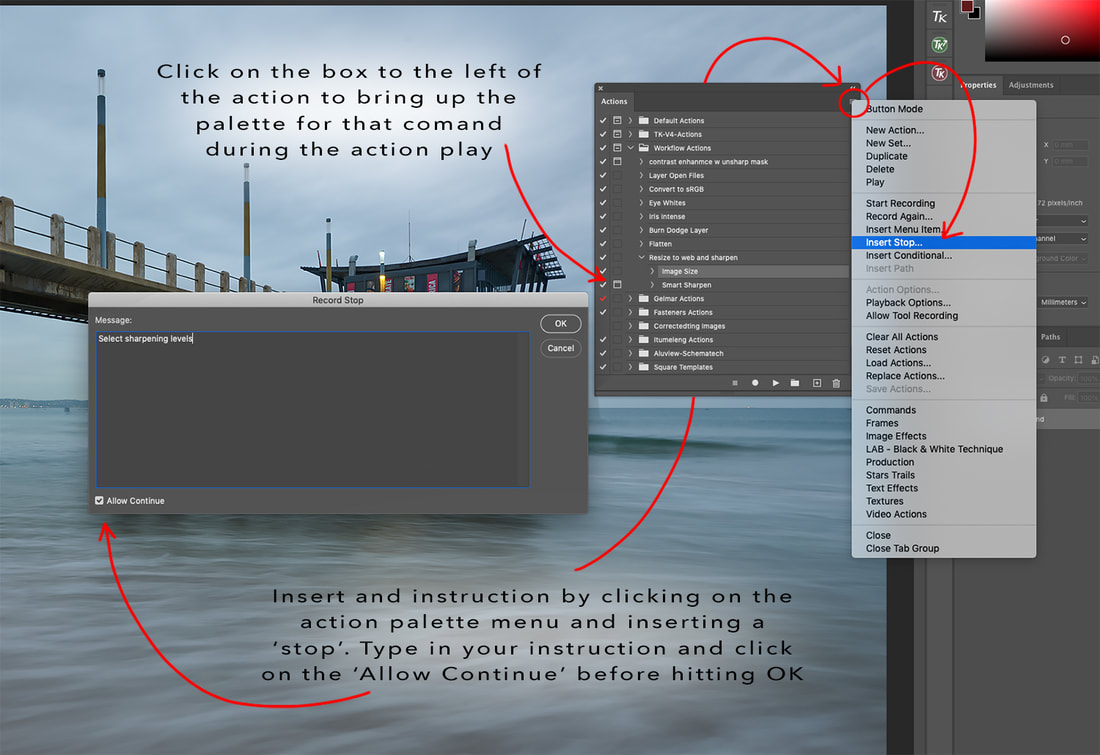
When you are in a programme like Lightroom or Capture One, the use of presets becomes a quick and easy - as well as fast - way to make changes to images. Rather than changing every setting individually, a photographer can select a preset that they have created, or even bought, to reset several parameters to one or several images at a time. To say that saves time is an understatement. Taking all the time required to individually adjust images, the use of presets can literally save hours out of a week of editing. Photoshop might not have presets built into it, but it does have actions, which can actually be more powerful. Unlike a preset, which just shifts a setting, an action will run a string of commands when selected (for users of Microsoft Excel, an action is exactly like a ‘macro’). Looking at something as simple as resizing an image for web requires several button clicks and dialogue settings (select image resize - select the settings - press okay - apply sharpening filter for the resized image - select settings - press okay - save for web and devices - select settings - press okay). An action can do the whole lot simply by pressing the play button on your action palette. The trick to creating useable actions is creating a pattern of commands that is non-layer specific, so that the action can run regardless of where you are in a photograph. To start with something fairly simple though, we can create a resizing action to resize for web, add sharpening based on the specific image and then save to a specific folder. The Action Palette The can access the action palette by going to Windows>Actions (shortcut key: Alt/Opt + F9 - some users might have to also hold down the fn key at the same time). The basic controls of the palette are shown int eh image below. Creating an Action It helps if you have a clear idea of the steps required to create the action. Step 1 - create a new action by clicking on the ‘create new action icon’. You will notice that the little circle/dot on the left bottom of the actions palette turns red to indicate that it is now recording. Anything that you now do is recorded as part of the action. Step 2 - For this action we are going to resize the image first by going to Image>Image Size (Opt+Cmd+I/Alt+Cntrl+I). The settings we’ll use are optimised for instagram, so 2000 pixels on the long side at a resolution of 72ppi. Step 3 - Notice that as you move through the steps the action is recorded in the actions palette (you will see little arrows that can also be opened as drop down menus to show the parameters of each individual command. If you wanted a very simple resize action it would be possible to click the ‘Stop Record’ icon at this stage. We want to create a more a complete action though, so we’ll continue with another command after the resize command. Incidentally you can stop and restart recording at any stage simply by using the record and stop record buttons at the bottom of the actions palette. Now that the image is resized we want to sharpen it for screen for that particular size. First set the pixels so that they are at 100% view (so that you can see the effect of sharpening). Do this by hitting Opt+Cmd+0/Alt+Cntrl+0 (you can also just hit Cmd+1 on recent CC packages). Notice that this view size is also reroofed in the action. Step 4 - We’re now going to sharpen the image using the Smart Sharpen dialogue. Go to Filter>Sharpen>Smart Sharpen and the Smart Sharpen dialogue comes up. The reason we resized the image to 100% was to see how the sharpening affects the image as we change the settings. Once again all of this is recorded in the actions palette. Step 5 - You can now switch off the recording of the action. To make sure that everything is working, go back in your history to the image before you did the resize (open the History panel by clicking through to Window>History and click on the top image square). If everything is working and the action runs accordingly, we can now go ahead and make it even more ‘intelligent’. Step 6 - Since all images are different it makes sense to have some panels that require adjustment every time that you run the action. Sharpening could be one of these. Open the action in the palette if it isn’t already open (uncompressed from the drop down list of actions that you previously recorded). To the left of each of the commands is a grey empty square. If you click on this it turns into a white box like a folder icon. Selecting this means that the dialogue will open up and you have to make a selection before the action will continue. Step 7 - Having dialogue pop up in the middle of an action can be confusing, so it is a good idea to add a stop to the action and a note just prior to a dialogue opening in the action. You can do this by highlighting the command before the dialogue opens, and then clicking on the actions palette menu and selecting ‘Insert Note’. In the example here I have given the note, ‘Select sharpening level’. This is a good visual reminder that the sharpening dialogue will appear when I click ‘Continue’ in the action.
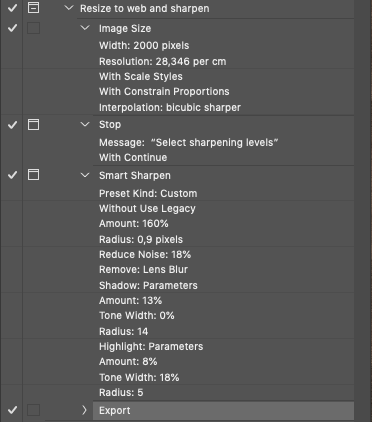
Step 8 - We can make the Action a little more complex by adding a save command as well. Use the history panel to go back to the beginning and run the action again, this time checking that the stop and open sharpening dialogue are working correctly. Then hit the record button again and go to File>Export>Save For Web (Legacy) or just hit Shift+Cmd+Opt+S/Shift+Cntrl+Alt+S. Hit save and select the folder you want the image to go to. In this instance every time that you run the action the resized image will end up in this folder (this makes sense if you are building an action in which to resize Instagram images for instance - in my workflow I have an action that resizes images and sends them to a dropbox folder so that I can quickly add them to my phone so as to post on Instagram etc.) Remember to stop recording the action at this point. Viola…a resize, sharpen and save action to improve workflow. Actions can be saved and loaded as well, meaning that you can purchase advanced actions ont he internet, or share actions with fellow photographers. To save an Action make sure that it is in a Group. Highlight the group and go to the Actions palette menu and hit ‘Save Actions’. By default the file should be saves as a .atn file into the Photoshop Presets folder, but you can can save the file anywhere you like (I like using a Dropbox folder so that I can sync across to different computers if necessary). Below is what the final action should look like without the save command expanded (it would be too long to fit in the in the screen).
1 Comment
|
Nature's Light
|
Services |
Company |
|
- Home
- Photography Courses
-
Photography Tours & Workshops
- South Africa >
-
Africa Workshops
>
- Uganda Private Wildlife Photography workshop
- Morocco - Meandering Morocco - 10 Nights
- Botswana - Photographing Giants - Botswana 5 night astrophotography workshop
- Lesotho - Expoloring The Mountain Kingdom - 6 night Landscape Workshop
- Namibia - Namibia's North - 13 Nights
- Namibia - Composing the Dunes - 14 Days
- Madagascar - Exploring the Island Continent - 15 Days
- Europe & the North >
- The 'Where To Next' Survey
- About Us
-
Gear Sales
- Leofoto
- Leofoto Flagship Tripods
- Leofoto Accessories
- Leofoto Mini Tripod & Smartphone
- Leofoto Monopods
- Leofoto Quick Release Plates
- Leofoto Ranger Tripods
- Leofoto Leveling Ranger Tripods
- Leofoto SOAR/PRS
- Leofoto Summit Tripods
- Leofoto Tripod Heads
- NiSi
- NiSi 100mm
- NiSi 150mm
- NiSi M75
- NiSi SWIFT Filter system
- NiSi Circular Filters
- NiSi Close Up Lens Kit NC 77mm
- NiSi Drone Filters
- F-Stop Questionnaire
- Blog
- NiSi SWIFT Filters


 RSS Feed
