BLOG
|
 It’s come a long since it was introduced to the Adobe suite (Photoshop 7.0 to be exact) in 2002. At that stage is magically blended your clone spot with the underlying pixels. I say magically, although in comparison to today’s voodoo like blending it was pretty rough. Still, it made the task of dust-spotting and cleaning up images infinitely easier than when we had to rely on careful clone-stamping at various opacity levels. For those who are unaware of what it is, the healing brush is a specialised tool in Photoshop that, like the clone stamp, takes pixels from one point and overlays them on another point. In this way the photographer can ‘heal’ dust spots and other blemishes. Basics First The healing brush (shortcut key ‘J’) has four subtotals: The Spot Healing Tool, Healing Brush, Patch Tool and Content Aware Move Tool. All four are similar tools in that they cover or move objects by blending pixels from nearby areas. You can cycle between the tools by holding down shift and hitting the J key (the Red-Eye Tool is actually also under the Healing Brush heading, so technically there are five tools that fall under the J shortcut key). I am going to start with the traditional Healing Brush as this is the best way to describe how to use the Healing Tool, despite it being the second option. To use the Healing you first have to select the source area on the screen, and then paint over the area that needs to be healed. The brush has the same adjustments as any normal brush by right clicking on the screen and adjusting size and hardness/feathering. You can also adjust size by using the square bracket keys ( [ and ]). With the Healing Brush Tool selected, move the area on screen that you would like to work on. Choose an area that is similar to what you want to cover your blemish with and left click on this while holding down the Alt/Opt key (you will see a target icon appear when you hold the Alt/Opt key down. Now move over the area to be healed and left click and paint over it. Photoshop takes the pixels from the area area and blends them over the target area to be healed. What is also useful is that there is a slightly opaque preview of the target area visible in the brush circle, meaning that you can line up the healing brush. This is useful if you are needing to clean the edge of a building for instance. The Spot Healing Tool is essentially an automatic healing brush, and it works surprisingly well (as of CC 2020 in my opinion as in prior versions I still found the standard Healing Brush more effective). You have the usual brush tools that are available by right-clicking on the screen (i.e. size and feathering/hardness of brush). To heal an object in the scene, simply resize the Spot Healing brush and paint over the offending pixels. Usually, like magic, Photoshop sources similar background pixels and layers and blends them over the area that needs to be cleaned up. If the Spot Healing Tool struggles a bit, then you can revert to the traditional Healing Brush Tool and manually select an area that you want to use as a source area. The Patch Tool is used for removing larger objects. Instead of using a brush, you can draw a line (in the same way as using a Lasso Tool) and then click and drag the selection to the source area to be merged over the target pixels. Importantly, the menu selection for the Patch Tool needs to be set to ‘Content Aware’. Watch the video below for an example. Finally, the Content Aware Move Tool is a clever tool to move an object somewhere else in the frame and artificially fill in the area left behind. You start in a similar way to using the Patch Tool, by drawing a rough line around the object to be moved. Once the selection is in place, you then click and drag the object to its new position. I everything works out, the empty patch lot behind is filled with background pixels. As in the example it helps if the subject is fairly separated from the background already, but it is quite surprising how effective the tool is in moving objects. Getting Clever One of the most powerful aspects of Photoshop is the ability to work in non-destructive layers. So it makes sense to make all these corrections to a separate layer. This means that if there are any mistakes made, it is easy to go back and erase those mistakes. You can also dial in the amount of opacity (so for instance it is possible to minimise the amount of sheen on a person’s skin by creating a new layer, roughly healing over the area of sheen, and then reducing the opacity of the healing layer so that the sheen is lessened, bit not removed). 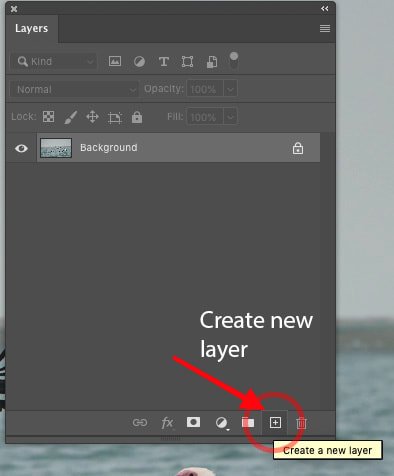 To create the New Layer and optimise it for healing, hit the Create New Layer button on the Layers palette.There are variations of this setting for all the healing tools apart from the Content Aware Move Tool, which requires the full layer. If you are wanting to use the Content Aware Tool it makes sense to duplicate the entire layer so that you have a separate layer with the change. This can then be masked out if there are any mistakes or artifacts as a result of the content move. 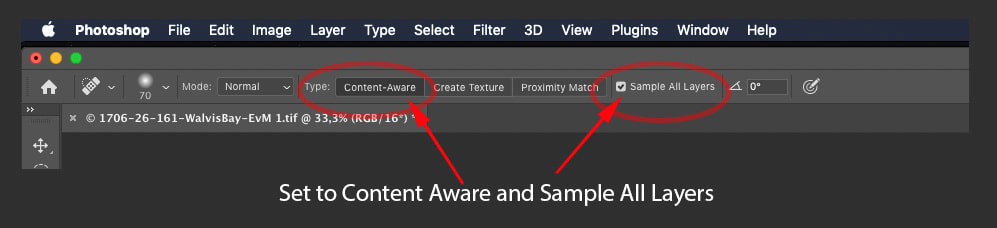 There are other ways to improve the healing options though: When using the Patch Tool you can actually start with the Lasso Tool (Shortcut Key L), draw your selection, then refine that selection by feathering it (right click and select feather), then with the selection in place (you will still see the marching ants, select the Patch Tool and move the selection to the source area. What this does is further soften the edges of the area to be blended, potentially making the the patch heal even more blended and indiscernible. You can also give your Spot Healing Tool and Healing Brush super-powers by changing the blend mode of the tool. The two really useful options here are darken and lighten. As an example, let’s say there are a bunch of white dust marks of a black subject. If you set the Spot Healing Tool to Darken, it will only heal the white dust marks and leave all the other darker tones alone. Similarly, if you have a mass of dark dust spots on a blue sky and set the blend mode to Lighten, it will very quickly heal away the dust spots, but leave any light toned clouds or blue gradient alone. 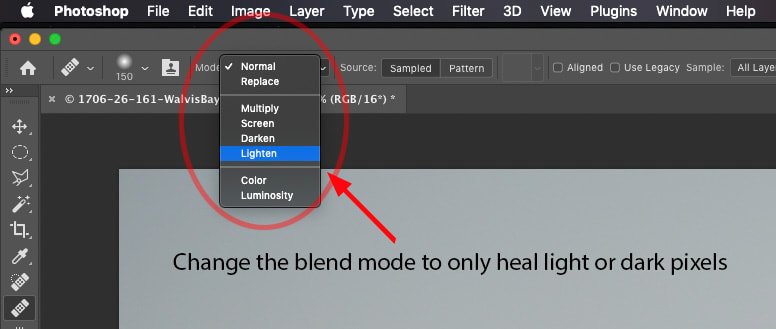 Dust Spots are unfortunately a reality of digital photography. Even if this is the only reason you have to learn about the Healing Brush Tool and it's variants, it makes sense getting to know the ins and outs of healing, and learning how to do it quickly and effectively so that you can spend more time shooting, and less time behind a computer. Although I am personally of the 'leave nature alone' school of thought, I have found use of the healing brush for cleaning up errant litter where it really shouldn't be (and of course as my day job is as a commercial photographer I am using the healing brush near constantly).
0 Comments
Leave a Reply. |
Nature's Light
|
 RSS Feed
Services |
Company |
|